| home Java Script MS Access Perl HTML Delphi C ++ Visual Basic Java CGIPerl MS Excel Front Page 98 Windows 98 Ms Word Builder PHP Assembler Link to us Links |
Nobody can master Visual Basic until he masters controls and properties. The form is the placeholder for the controls, and the controls are the really important parts of any application. Many of the properties require different kinds of values, and you will learn in this hour's lesson how to set those values.
Before you finish this lesson, you also will have created your very first application from scratch without the aid of the VB Application Wizard. You will have created a new project, sized the form, added controls, set control properties, and even written an event procedure using the Visual Basic programming language! As you'll soon see, Visual Basic makes all those tasks simple.
The highlights of this hour include
When you create an application from scratch, instead of using the VB Application Wizard to generate the program shell, you control every aspect of the application's design and you place all the program's controls on the form yourself. When you place those controls, you must name the controls, position the controls, set control properties, adjust the control sizes, and hook up all the event procedure code that goes with each control.
All this may sound daunting, but Visual Basic makes things as simple as possible. Although the task is not quite as simple as running the wizard, you have the power to create the exact application you need. Newcomers need to learn how to create applications without the wizard so they can fully master all the ins and outs of Visual Basic.
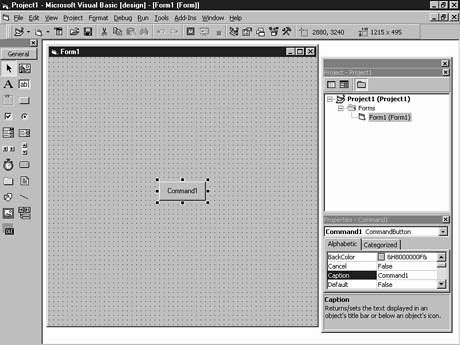
To create a new application from scratch, start Visual Basic and double-click the icon labeled Standard EXE. The blank Form window appears in the work area's upper-left corner next to the toolbox, ready for you to begin creating the application by placing the controls.
TIP: The default Form window size is fairly small, especially when you realize that the Form window holds the application's background. Most applications appear either full-screen or in an initial window much larger than the Form window size that appears. Therefore, one of the first tasks you will usually perform is to increase the Form window's size.
If you double-click the Form window's title, Visual Basic expands the Form window to a full- screen size. However, with your toolbox and other windows on the screen, you'll have to use the scrollbars to access various parts of the form. Of course, if your application is full screen, you'll need to work with the scrollbars to add controls to the full form.
NOTE: This book's Form windows typically remain a size at which you can see all the form as well as the surrounding windows. Therefore, most of the applications in this book contain fairly small Form windows. The book's Form windows will be larger than the default size that appears when you first start Visual Basic, but the Form windows will be far smaller than full screen.
The controls you select for your application's form are important because the controls (also called tools) provide the application interface for your users. Users interact with your application by clicking the controls and entering text in the controls. Placing and sizing controls are perhaps the two most important tasks you can master at this point.
Once you increase the Form window to a reasonable size that your application requires, your job is to place controls on the form. Use either of these two methods for placing controls on the form:
Figure 3.1. The command button appears in the center of the Form window.
Figure 3.2. The second command button is placed and sized immediately.
You can change the size of only a selected control. The eight sizing handles are the key to resizing the control. You can drag any of the eight sizing handles in any direction to increase or decrease the control's size. Of course, if you placed a control on the form by dragging the control, you won't need to resize the control as often as you will if you double-clicked the toolbox tool to place the control.
You can move a selected control to any area of the Form window by dragging the control with your mouse. Once you click to select a control, click the control and hold down the mouse button to drag the control to another part of the Form window.
Sometimes you may want to drag several controls to a new location as a group. For example, perhaps you've placed a set of command buttons at the bottom of a form and after adjusting the Form window's size, you determine that you need to move the buttons down some. Although you can move the command buttons one at a time, you can more quickly select all the command buttons and move them as a group.
As stated earlier, you can select more than one control by holding the Ctrl key as you click a control. (Much of the Windows interface, such as Explorer and the Windows Desktop, lets you select multiple files and icons the same way as Visual Basic lets you select multiple controls.)
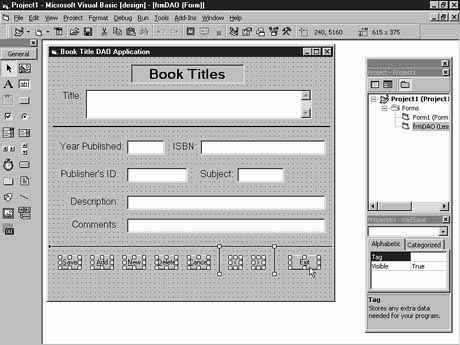
In addition, you can lasso the controls by dragging a selection rectangle around
the controls you want to select as a group. When you release your mouse, the controls
within the selected region will be selected, like those shown in Figure 3.3.
Figure
3.3. Selecting multiple controls when you want to move the entire group
at once.
TIP: Remember how to select multiple controls if you find yourself needing to change other properties beside the location of controls. If you select multiple controls before changing a control property, all controls in the selected range will take on that new property value. You can only change the common properties that appear in all of the selected controls.
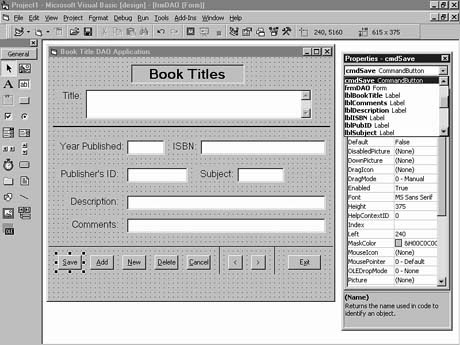
As you add controls to the Form window, the Properties window updates to show
the properties for the currently selected control. The selected control is usually
the control you last placed on the form. Visual Basic lets you see a control's properties
in the Properties window by clicking to select the control or by selecting the control
from the Properties window's drop-down list box, as shown in Figure 3.4.
Figure
3.4. Selecting the control to work with.
NOTE: Visual Basic programmers often use the generic term object to refer to controls, forms, menus, and various other items on the screen and in the code.
Scroll the Properties window to see the various properties for the selected controls. Each kind of control supports the same set of properties. Therefore, every command button you place on the form supports the same properties (and events as well) as every other command button, but option buttons and text boxes support different sets of properties than command buttons.
The Left, Top, Height, and Width properties are about the only properties you can set without accessing the Properties window. As you size and move a control into place, Visual Basic updates the Left, Top, Height, and Width properties according to the control's placement on the Form window and the control's size. As with the form location and size measurements, these properties appear in twips (unless you specify a different value in the ScaleMode property). Left indicates how far from the form's left edge the control appears, Top indicates how far from the top of the form the control appears, and the Height and Width properties indicate the control's size.
NOTE: Even the form has properties. Click your Form window and look at the Properties window. The form will be the selected object at the top of the Properties window (Form1 is the default name for an application's initial form).
After you place and size a control, the first property you should modify is the Name property. Although Visual Basic assigns default names to controls when you place the controls on the Form window, the default names don't indicate the control's true purpose in your application. In addition, the default names don't contain the three-letter prefix that describes the control you learned about in Hour 2, "Analyzing Visual Basic Programs."
For your reference, Table 3.1 lists common prefixes used for control names. When you name your Form window's controls, you'll appreciate later that you took the time to type the three-letter abbreviations at the beginning of the names because you will be less likely to assign a text box a property that belongs to a command button control inside an event procedure. (Such an assignment will cause a runtime error.)
NOTE: The Name property is so important that Visual Basic lists the Name property first (as (Name) inside parentheses) in the Properties window instead of alphabetically in the Properties window, where the other properties reside.
Table 3.1. Use these prefix abbreviations before control names.
| Prefix | Control |
| cbo | Combo box |
| chk | Check box |
| cmd | Command button |
| dir | Directory list box |
| drv | Drive list box |
| fil | File list box |
| fra | Frame |
| frm | Form |
| grd | Grid |
| hsb | Horizontal scrollbar |
| img | Image |
| lbl | Label |
| lin | Line |
| lst | List box |
| mnu | Menu |
| ole | OLE client |
| opt | Option button |
| pic | Picture box |
| shp | Shape |
| tmr | Timer |
| txt | Text box |
| vsb | Vertical scrollbar |
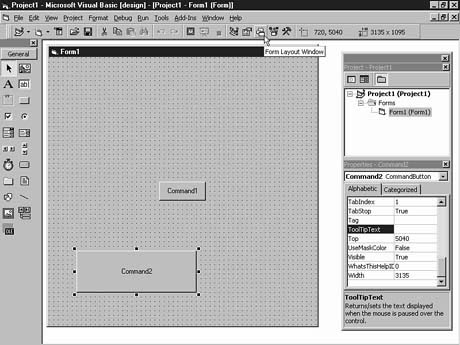
New Term: A tooltip is a pop-up description box that appears when the user rests the mouse pointer over a control.
Some property values you set by typing the values directly in the Properties window. For example, to enter a value for a control's ToolTipText property, click once on the Properties window's ToolTipText property and type the tooltip text.
The tooltip is a great feature that helps your users and is as easy to implement as typing text into the control's ToolTipText property. Most applications since the introduction of Windows 95 include tooltips, and there's no reason why your applications should not include them as well.
Figure 3.5 shows a tooltip that appears in Visual Basic when you rest the mouse
pointer over the Form Layout window toolbar button. The best time to add tooltip
text is when you adjust a new control's properties because you are more likely to
remember the primary purpose for the control. Often, when programmers plan to add
such items later once they "complete" the application, the items to be
added, especially helpful items such as tooltips, are not added.
Figure
3.5. The tooltip pops up to describe an
object.
If you want to change a property value, such as the Name property, you can click the Name property and enter a new name. As you type, the new name replaces the original name. If instead of clicking you double-click the property, Visual Basic highlights the property value and lets you edit the existing value by pressing your cursor keys and using Insert and Delete to edit the current property value.
TIP: As you select a property, read the text that appears at the bottom of the Properties window. The text describes the property and serves as a reminder about what some of the more obscure properties do.
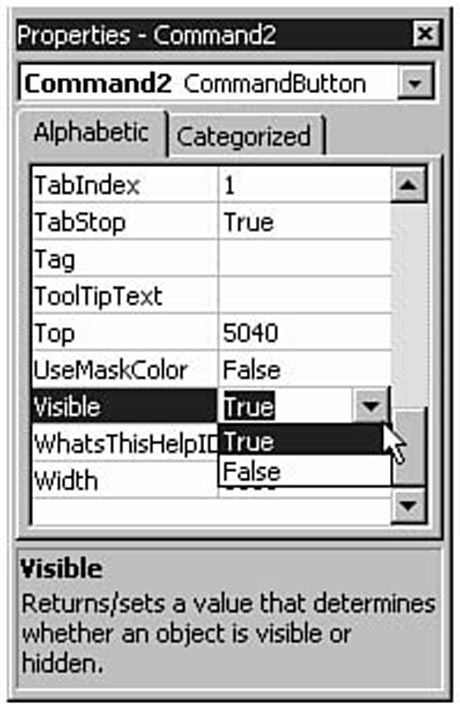
Some properties require a selection from a drop-down list box. For example, Figure
3.6 shows a command button's Visible property's drop-down list box. The
Visible property can either be True or False. No other
values work for the property, so Visual Basic lets you select from one of those two
values when you click the property value to display the down arrow and open the drop-down
list box.
Figure
3.6. Some properties require a selection
from a list box.
If an ellipsis (...) is displayed when you click the property value, such as the Font property when you click the current Font property's value, a dialog box opens when you click the ellipsis. A Font property is more than just a style name or size. The control's Font property can take on all kinds of values and the Font dialog box that appears from the click of the ellipsis lets you specify all available Font property parts. When you close the dialog box, the compound property is set to the dialog box's specific values.
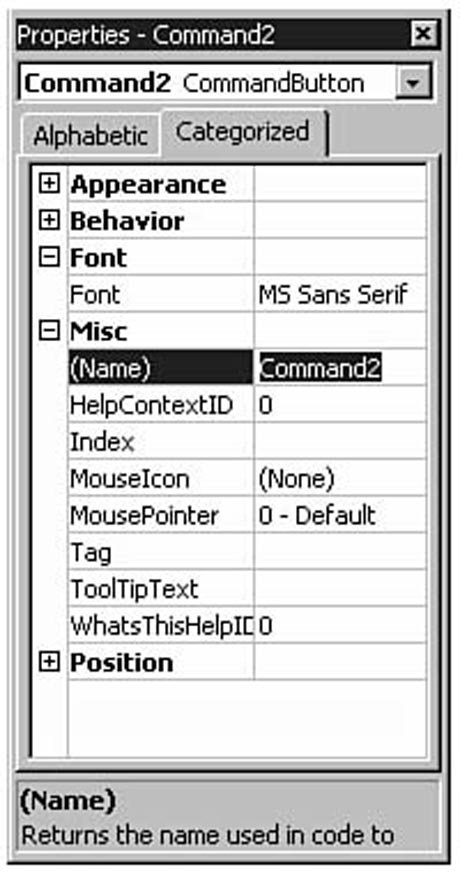
Some programmers prefer the Categorized view of the Properties window. By default,
the Properties window displays its properties alphabetically (with a possible exception
at the top of the Properties window, such as the Name property). When you
click the Categorized tab above the property values, the Properties window changes
to show the properties in an Explorer tree view such as the one in Figure 3.7.
Figure
3.7. These property values appear by category type.
If you needed to change all of a control's appearance values, such as Color and Caption, you could expand the Categorized view's Appearance entry to display all the appearance values together. You then can more quickly change the appearance than if you had to search through the alphabetical listing of properties.
As you can see, placing a control requires much more involvement with property values than simply moving and sizing the control. You rarely if ever have to change all of a control's properties because many of the default values work fine for most applications. Nevertheless, many property values work to make the control unique to your specific application.
A named literal, also called a named constant, is a special named value that represents a fixed value. Visual Basic comes with several named literals and you'll use many of them in your programs to assign values to controls at runtime.
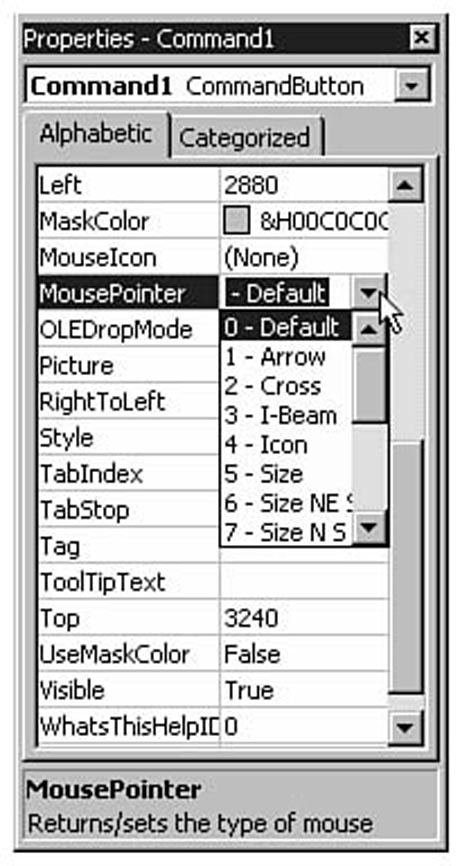
Consider the drop-down list box that appears when you click on a command button's MousePointer property (see Figure 3.8). The MousePointer property requires a value from 0 to 15 (or 99 for a custom value). When you set property values at design time, you simply select from the list, and the descriptions to the right of the numeric values explain what each value is for. When programming, you will be able to assign property values to properties when the user runs the program. Although you can assign 2 to the property value to change the mouse cursor to a crosshair during one part of the running application, your code will be better if you assign the named literal vbCrosshair. Although vbCrosshair is longer to type, you will know what you assigned when you later look at the project.
We're getting slightly ahead of ourselves discussing runtime property values that
change inside the code such as event procedures. Nevertheless, keep named literals
in mind as you assign values to the Properties window at design time. The named literals
often closely match their Properties window counterparts. When you're ready to use
named literals in subsequent lessons, this book describes the ones available for
the controls being discussed.
Figure
3.8. You can assign a named literal to
this property.
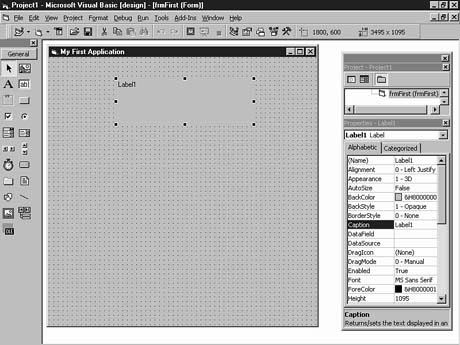
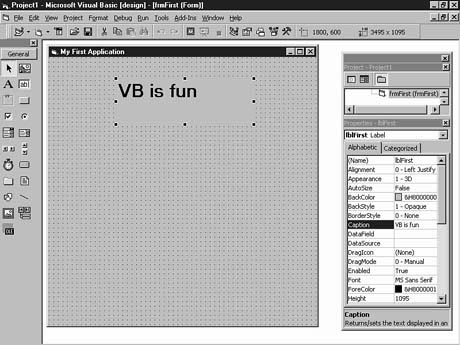
In this section, you are going to create a project from scratch without the help of the VB Application Wizard. You'll create a new project, assign controls, and write event procedure code to hook everything together. The final application will be simple, but you'll have little trouble understanding the application now that you've become more familiar with properties and event procedures.
To create your first application, follow these steps:
Figure
3.9. A label is this form's first control.
Figure
3.10. The label needs to be centered.
Private Sub cmdExit_Click()

End Sub
TIP: Indent the body of the code from the surrounding wrapper lines as follows so you'll be able to distinguish procedures from one another when you read through a list of them:Private Sub cmdExit_Click() End End Sub
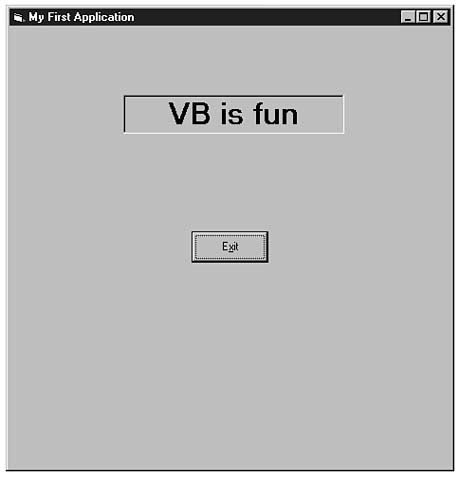
Press F5 to run the program and watch your creation appear. As shown in Figure 3.11, the form appears with the label and command button in place.
Terminate the application by clicking the Exit command button. Visual Basic regains control. (If you had compiled the application, you could run the compiled .EXE file from the Windows Run command or from an icon if you assign the .EXE file to an icon on the Desktop or to an option on the Start menu.)
Save your first application. When you save the project, Visual Basic saves all
the files within the project. Select File | Save Project. Visual Basic asks for the
form's name with a Save File As dialog box (remember that each element of the project
is a separate file). You can select a different drive or pathname if you wish. Save
the form module file under the name Lesson 3 Form (Visual Basic automatically
adds the .FRM filename extension). Visual Basic now requests the name of
the project with a Save Project As dialog box. Type Lesson 3 Proj and click
Save to save the project file (Visual Basic automatically adds the .VBP
filename extension). If you were to edit the project, Visual Basic would not need
to request the filenames subsequently now that you've assigned them.
Figure
3.11. Your first running application works
well!
Take a rest before starting Hour 4, "Examining Labels, Buttons, and Text Boxes." Exit Visual Basic and give your computer's circuits a break as well. You are well on your way to becoming a Visual Basic guru, so feel good about the knowledge you've already gained in three short hours.
This hour you learned how to place controls onto a form and how to size and move the controls. Once you place controls, you must set the control property values so that the controls take on the values your application requires. (Don't you wish you could set your real estate property values just as easily?)
The next hour gets specific and describes these three common controls in detail: command buttons, labels, and text boxes.
The quiz questions and exercises are provided for your further understanding. See Appendix C, "Answers," for answers.
lblClick.Caption = "Clicked!"