| home Java Script MS Access Perl HTML Delphi C ++ Visual Basic Java CGIPerl MS Excel Front Page 98 Windows 98 Ms Word Builder PHP Assembler Link to us Links |
![]()
![]()
![]()
![]()
![]()
Chapter 5, "What Every Developer Needs to Know About Query Basics," discusses all the basics of query design. Access's query capabilities are immense. In addition to the relatively simple Select queries covered in Chapter 5, Access allows you to create Crosstab queries, Union queries, Self-Join queries, and many other types of complex selection queries. It is also easy to build Access queries that modify rather than retrieve information. These topics, and the more advanced aspects of query design, are covered in this chapter.
Access Action queries allow you to easily modify data without writing any code. In most cases, Action queries are actually more efficient than accomplishing the same task using code. Four types of Action queries are available: Update, Delete, Append, and Make Table. Update queries allow you to modify data within a table. Delete queries are used to remove records from a table. Append queries allow you to add records to an existing table, whereas Make Table queries create an entirely new table. Each type of query, and its appropriate uses, are covered in this chapter.
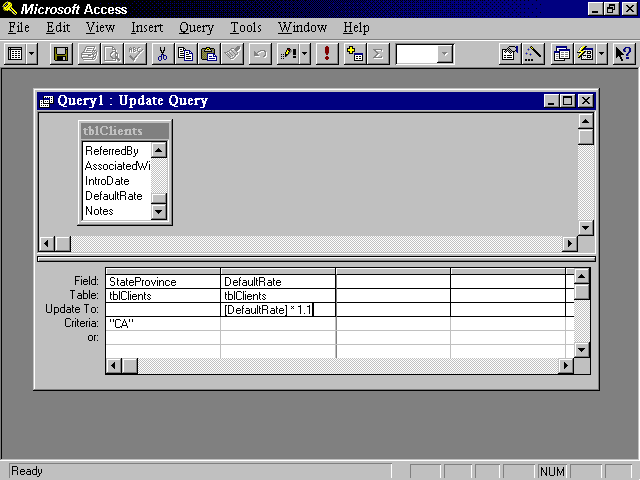
Update queries are used to modify all records or records meeting specific criteria. They can be used to modify the data within one field or several fields (or even tables) at one time. An example would be a query that increases the salary of everyone in California by 10 percent. As mentioned, using Update queries is usually more efficient than accomplishing the same task using VBA code. They are therefore considered a respectable way to modify table data.
To build an Update query, follow eight steps:
Figure 12.1. An Update query that increases the DefaultRate for all clients in California.
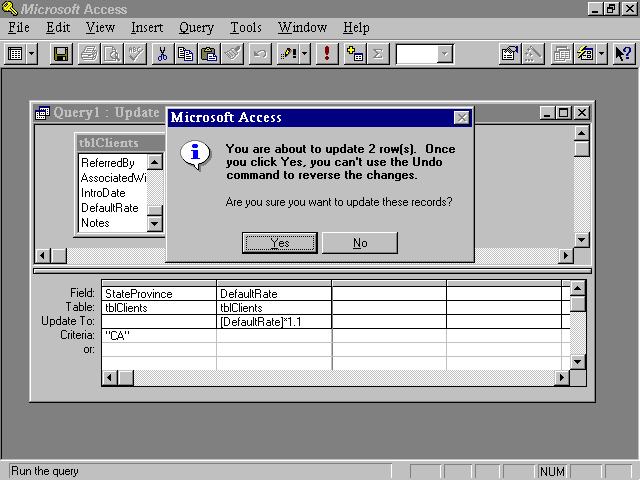
Figure 12.2. The confirmation message when running an Update query.
Access Update queries should be named with the prefix qupd. Each type of Action query should be given a prefix indicating what type of query it is. Table 12.1 specifies all the proper prefixes for Action queries.
Type of Query |
Prefix |
Example |
|
Update |
qupd |
qupdDefaultRate |
|
Delete |
qdel |
qdelOldTimeCards |
|
Append |
qapp |
qappArchiveTimeCards |
|
Make Table |
qmak |
qmakTempSales |
All Access queries are stored as SQL (Structured Query Language) statements. Access SQL is discussed later in this chapter. The SQL behind an Access Update query looks like this:
UPDATE DISTINCTROW tblClients SET tblClients.DefaultRate = [DefaultRate]*1.1

     WHERE (((tblClients.StateProvince)="CA"));
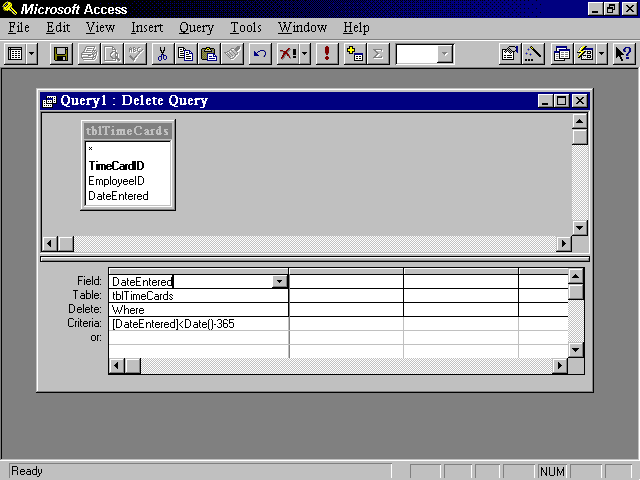
Rather than simply modifying table data, Delete queries are used to permanently remove records from a table. Delete queries are often used to remove old records from a table. For example, you might want to delete all orders that occurred in the previous year. Delete queries permanently remove all records meeting the specified criteria. Follow four steps to build a Delete query:
Figure 12.3. A Delete query used to delete all time cards entered over a year ago.
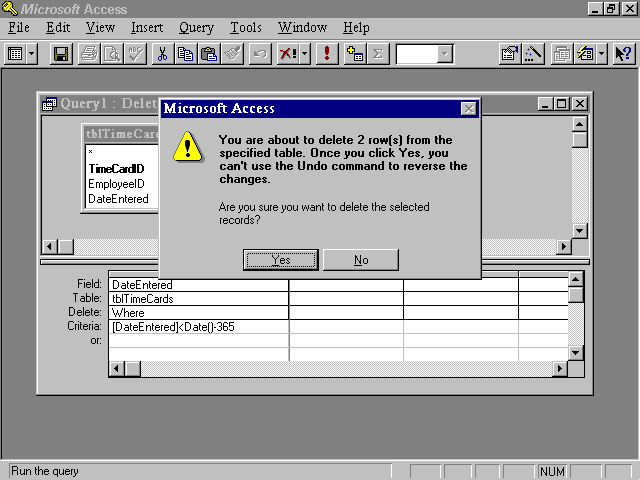
Figure 12.4. The Delete query confirmation message box.
The SQL behind a Delete query looks like this:
DELETE DISTINCTROW tblTimeCards.DateEntered

     FROM tblTimeCards

     WHERE (((tblTimeCards.DateEntered)<Date()-365));
Append queries allow you to add records to an existing table. This is often done during an archive process. First, the records that are to be archived are appended to the history table using an Append query. They are then removed from the master table using a Delete query. To build an Append query, follow five steps:
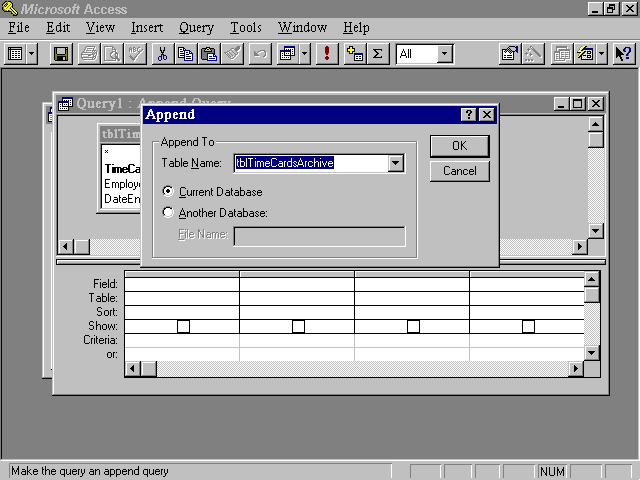
Figure 12.5. Append Query Table Selection dialog.
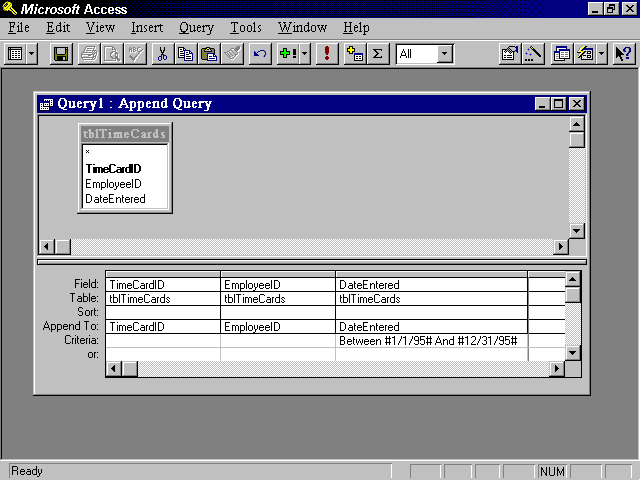
Figure 12.6. Example of Append query that appends the TimeCardID, EmployeeID, and DateEntered of all employees entered within the year of 1995 to another table.
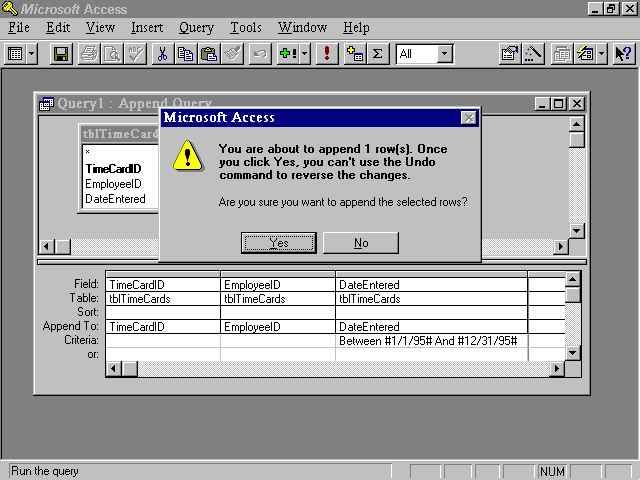
Figure 12.7. Append Query confirmation message box.
The SQL behind an Append query looks like this:
INSERT INTO tblTimeCardsArchive ( TimeCardID, EmployeeID, DateEntered )

     SELECT DISTINCTROW tblTimeCards.TimeCardID, tblTimeCards.EmployeeID,

     tblTimeCards.DateEntered

     FROM tblTimeCards

     WHERE (((tblTimeCards.DateEntered) Between #1/1/95# And #12/31/95#));
Figure 12.8. The warning message that appears when running an Append query and conversion, primary key, lock, or validation rule violations occur.
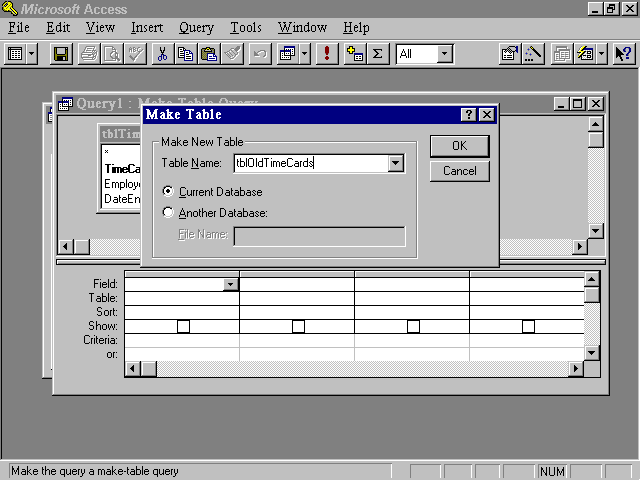
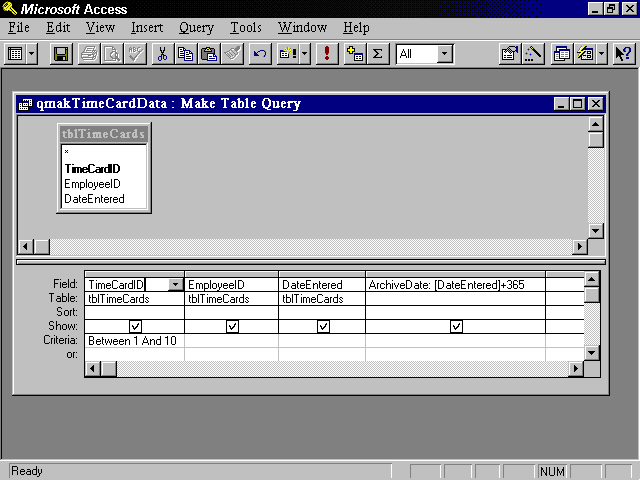
Whereas an Append query adds records to an existing table, a Make Table query is used to create a new table. The new table is often a temporary table used for intermediary processing. Such a temporary table is often created to freeze data for the period of time that a report is being run. By building temporary tables and running the report from those tables, you ensure that users cannot modify the data underlying the report during the reporting process. Another common use of a Make Table query is to provide a subset of fields or records to another user. Six steps are required to create a Make Table query:
Figure 12.9. The Make Table query table selection dialog.
Figure 12.10. Adding an expression to a Make Table query.
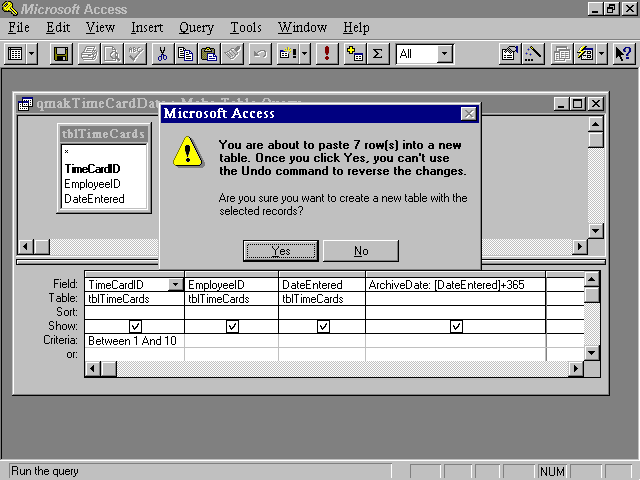
Figure 12.11. The Make Table query confirmation message box.
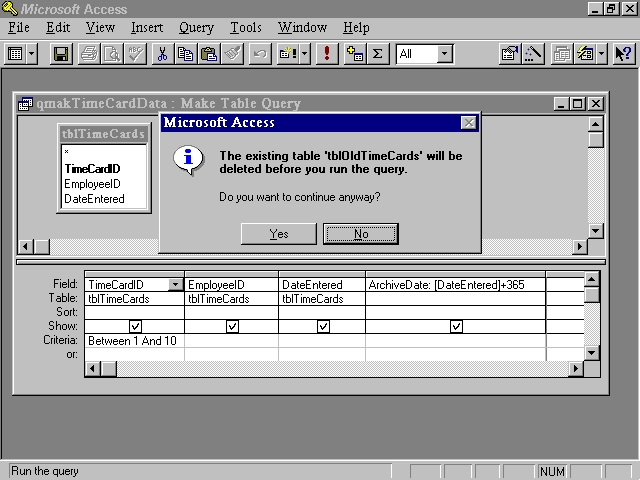
Figure 12.12. The Make Table query warning message when table exists.
The SQL for a Make Table query looks like this:
SELECT DISTINCTROW tblTimeCards.TimeCardID, tblTimeCards.EmployeeID,

     tblTimeCards.DateEntered, [DateEntered]+365 AS ArchiveDate

     INTO tblOldTimeCards

     FROM tblTimeCards

     WHERE (((tblTimeCards.TimeCardID) Between 1 And 10));
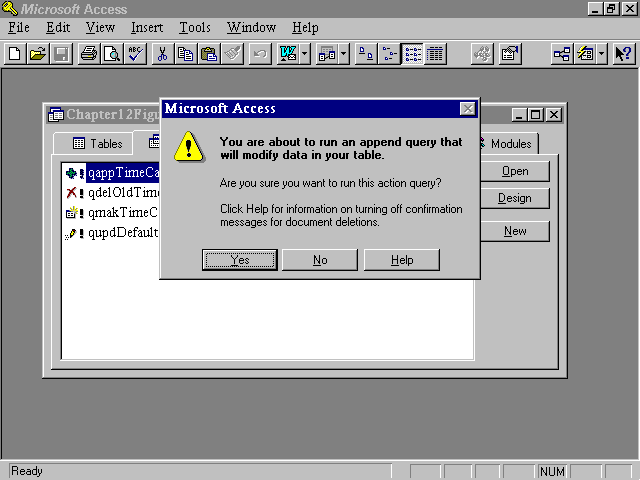
Additional warning messages appear when running Action queries from the Database window or using code. An example of such a message appears in Figure 12.13. This message, and all other query messages, can be suppressed programmatically using the SetWarnings method of the DoCmd object. The code looks like this:
DoCmd.SetWarnings False.
Figure 12.13. The warning message when running an Action query from code.
To suppress warnings by modifying the Access environment, select Tools|Options. Click the Edit/Find tab. Remove the check mark from the Action Queries Confirm check box.
As mentioned earlier in this chapter, Action queries can be significantly more efficient than VBA code. Consider an example:
Sub ModifyPrice()

    Dim db As DATABASE

    Dim rs As Recordset

    Set db = CurrentDb()

    Set rs = db.OpenRecordset("tblOrderDetails")

    Do Until rs.EOF

        If rs!UnitPrice > 1 Then

            rs.Edit

            rs!UnitPrice = rs!UnitPrice - 1

            rs.UPDATE

        End If

        rs.MoveNext

    Loop

End Sub
This subroutine loops through tblOrderDetails. If the UnitPrice of a record is greater than 1, the price is reduced by 1. Compare the ModifyPrice subroutine to the following code:
Sub RunActionQuery()

     DoCmd.OpenQuery "qupdUnitPrice"

End Sub
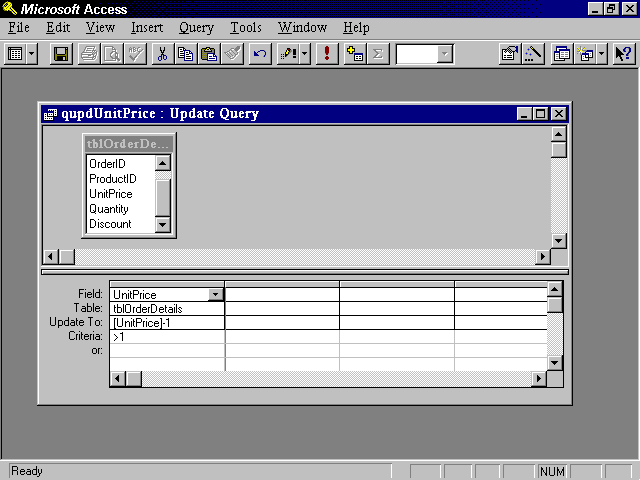
As you can see, the RunActionQuery subroutine is significantly easier to code. The qupdUnitPrice query is pictured in Figure 12.14. It accomplishes the same tasks as the ModifyPrice subroutine. In most cases, the Action query runs more efficiently.
Figure 12.14. The qupdUnitPrice query decrements the UnitPrice for all records where the UnitPrice is greater than 1.
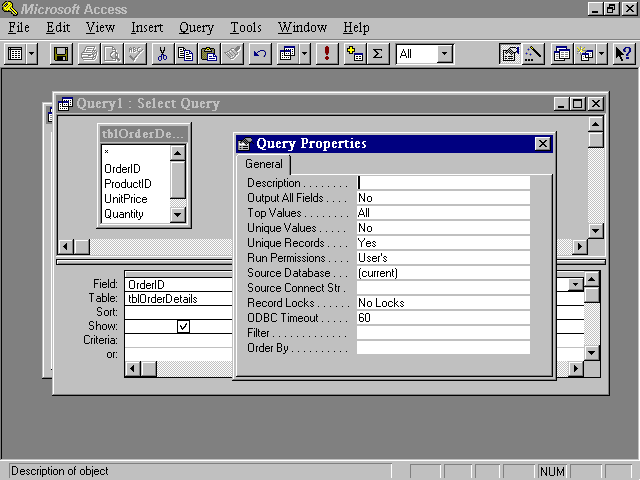
Access 95 queries have several properties that can dramatically alter their behavior. To access a query's properties, click with your right mouse button on a blank area in the top half of the Query window and select Properties. The Properties window appears (see Figure 12.15). Many of these properties are discussed in Chapter 5. The three properties discussed here are Unique Values, Unique Records, and Top Values.
Figure 12.15. The Query Properties window.
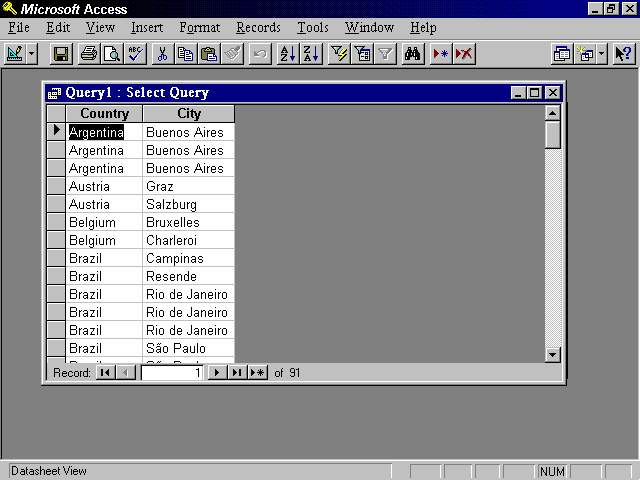
The Unique Values property, when set to Yes, causes the query output to contain no duplicates for the combination of fields included in the query output. Consider the examples in Figures 12.16 and 12.17. Figure 12.16 shows a query that includes the Country and City fields from tblCustomers. The Unique Values property in this example is set to No, its default value. Notice that many combinations of countries and cities appear more than once. This occurs whenever more than one customer is found within a particular country and city. Compare this with Figure 12.17, where the Unique Values property is set to Yes. Each combination of country and city appears only once.
Figure 12.16. Query with Unique Values property set to No.
Figure 12.17. Query with Unique Values property set to Yes.
The default value for the Unique Records property is Yes. This causes the DISTINCTROW statement to be included in the SQL statement underlying the query. The Unique Records property applies only to multitable queries. It is ignored for queries including only one table. The DISTINCTROW statement allows the results of a multitable query to be updatable by ensuring that each record included in the query output is unique.
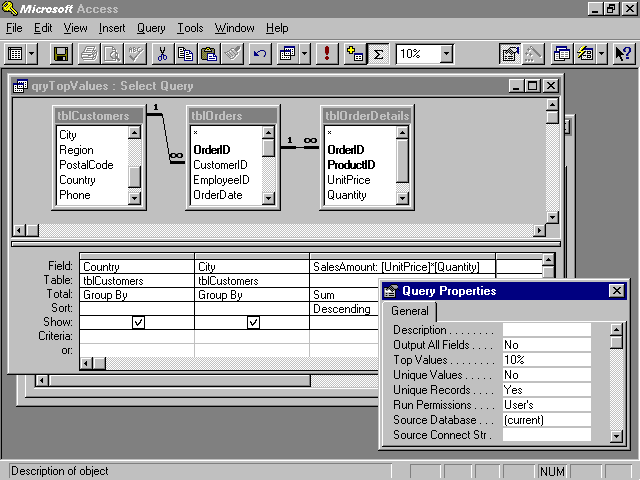
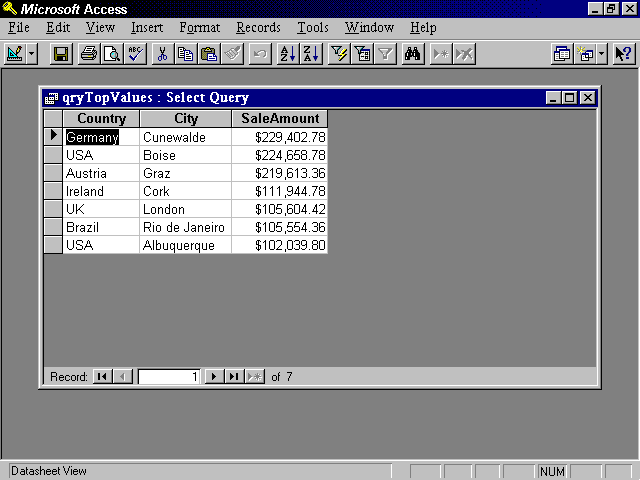
The Top Values property allows you to specify a certain percentage of or a specific number of records that the user wants to view in the query result. For example, you can build a query that outputs the country/city combinations that have the top 10 sales amounts. You can also build a query that shows the country/city combinations whose sales ranked in the top 50 percent. You can specify the Top Values property in a few different ways. Here are two examples:
Figure 12.18 shows the design of a query that shows the country/city combinations with the top 10 percent of sales. The query is a Totals query that summarizes the result of the price multiplied by the quantity for each combination of country and city. Notice that the Top Value property is set to 10 percent. The output of the query is sorted in descending order by the result of the SaleAmount calculation (see Figure 12.19). If the SaleAmount field were sorted in ascending order, the bottom 10 percent of the sales amount would be displayed in the query result. It is also important to understand that the field being used to determine the top values must appear as the left-most field in the sort order of the query.
Figure 12.18. A Totals query that retrieves the top 10 percent of the sales amounts.
Figure 12.19. Result of Totals query showing the top 10 percent of the sales amounts.
The Microsoft Jet database engine includes an Optimizer. This Optimizer looks at how long it takes to accomplish each task involved in the process of producing the required query results. It then produces a plan for the shortest path to accomplishing the desired results. This plan is based on several statistics:
These statistics are updated whenever the query is compiled. For a query to be compiled, it must be flagged as needing to be compiled. A query is flagged to be compiled when any of the following occurs:
Once a query has been flagged as needing to be compiled, it will not be compiled until the next time the query is run. The compiling process takes one to four seconds. During the compilation process, the updating of all statistics occurs, and a new optimization or Query Plan is produced.
When analyzing the time it takes for a particular query to run, it is important to time two tasks:
The first measurement is fairly obvious; it measures the amount of time it takes from the moment the Run button is selected on the toolbar until the first screen of data is displayed. The second measurement is a little less obvious; it involves waiting until the "N" value in "Record 1 of N" at the bottom of the query result displays. The two measurements might be the same if the query returns only a small number of records. This is because the Jet engine decides whether it is more efficient to run the query and then display the query results or to display partial query results and then continue running the query in the background.
You can do many things to improve a query's performance. These include, but are not limited to, the following techniques:
Probably one of the most important things to learn from the tips listed here is that they should not be blindly followed. Query optimization is an art rather than a science. What helps in some situations might actually do harm in others. It is important to do benchmarks with your actual system and data.
As mentioned, Rushmore is a data-access technology that can be used to help improve the processing of queries. Rushmore technology can be utilized only when certain types of expressions are included in the query criteria. It will not automatically speed up all your queries. A query must be constructed in a certain way for the query to benefit from Rushmore.
A query containing an expression and comparison operator as the criteria for an Indexed field can be optimized by Rushmore. The comparison operator must be <, >, =, <=, >=, <>, Between, Like, or In.
The expression can be any valid expression, including constants, functions, and fields from other tables. Examples of optimizable expressions are
[Age] > 50

[OrderDate] Between #1/1/96# And #12/31/96#

[State] = "CA"
Rushmore can also be used to optimize queries including complex expressions that combine the And and Or operators. If both expressions are fully optimizable, the query will be fully optimized. If only one expression is fully optimizable and the expressions are combined with an And, the query will be partially optimized. If only one expression is fully optimizable and the expressions are combined with an Or, the query will not be optimized.
You should remember a few important notes about Rushmore:
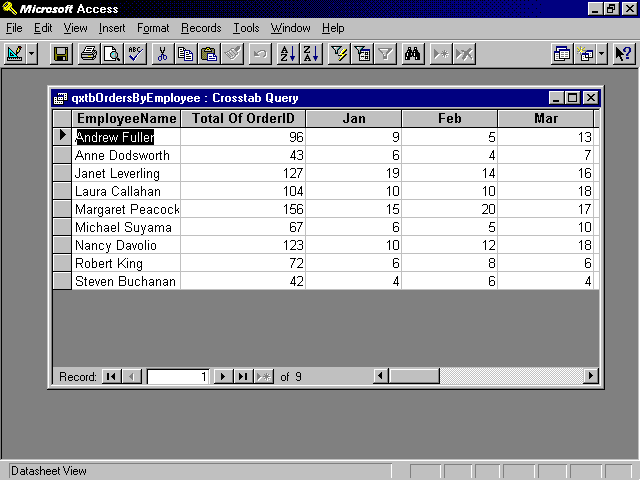
A Crosstab query is a query that summarizes query results by displaying one field in a table down the left side of the datasheet and additional facts across the top of the datasheet. For example, a Crosstab query can summarize the number of orders placed each month by salesperson. The name of each salesperson can be placed within the left-most column of the query output. Each month can be displayed across the top of the query output. The number of orders placed would appear in the appropriate cell of the query output (see Figure 12.20).
Figure 12.20. An example of a Crosstab query that shows the number of orders placed by each employee by month.
Crosstab queries are probably one of the most complex and difficult queries to create. For this reason, Microsoft has provided a Crosstab Query Wizard. The methods for creating a Crosstab query with and without the Crosstab Query Wizard are explained in this section.
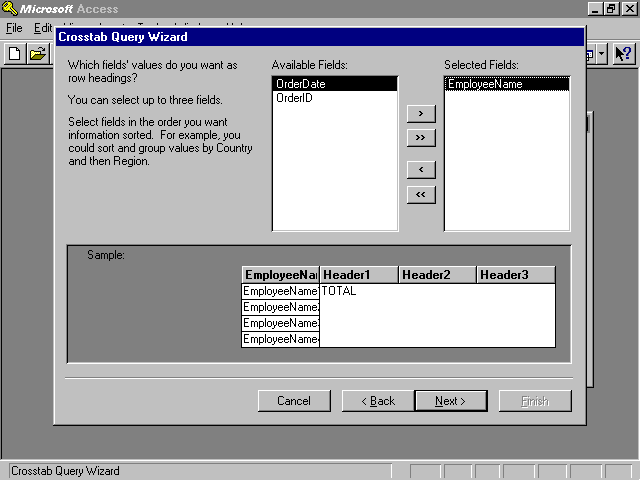
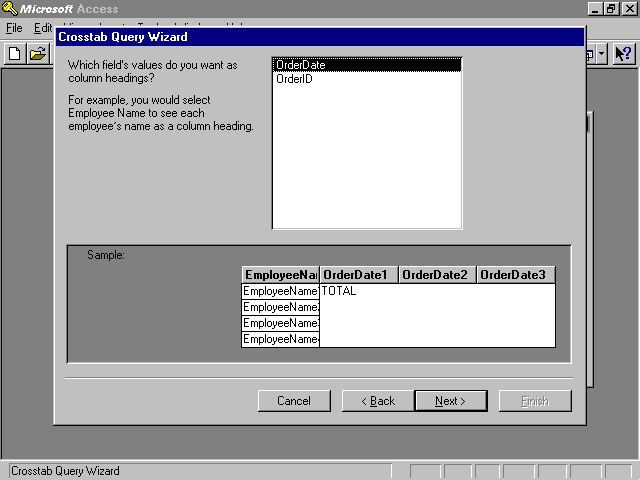
Eight steps are required to design a Crosstab query using the Crosstab Query Wizard:
Figure 12.21. Specifying the rows of a Crosstab query.
Figure 12.22. Specifying the columns of a Crosstab query.
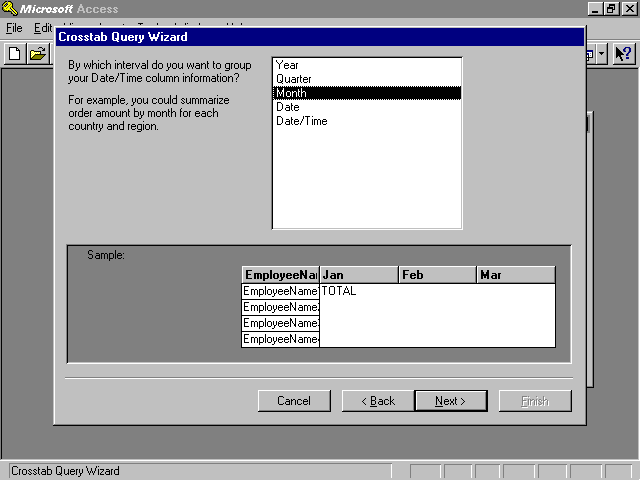
Figure 12.23. Specifying the interval for a Date field of a Crosstab query.
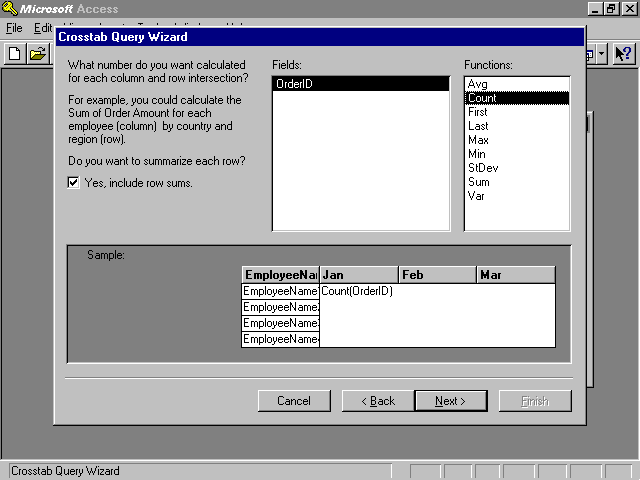
Figure 12.24. Specifying the number you want the Crosstab query to calculate.
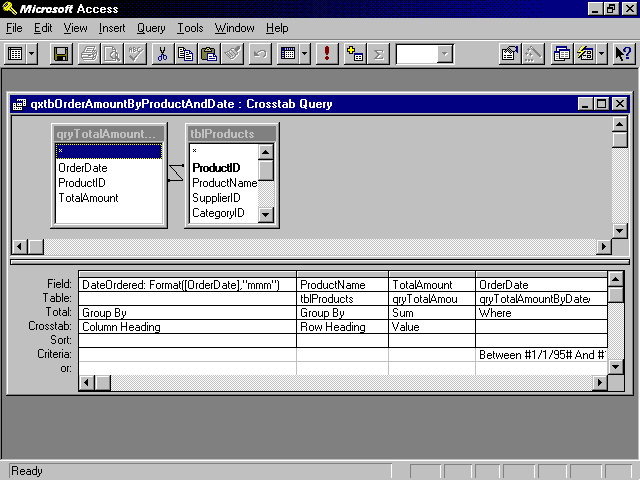
Figure 12.25 shows a completed Crosstab query in Design view. Several attributes of the completed query are important. Notice the Crosstab row of the query grid. The EmployeeName is specified as a row heading. The EmployeeName field is used as a Group By for the query. The following expression is included as a Column Heading:
Format([OrderDate],"mmm").
This expression returns the order date formatted to display only the month. This expression is also used as a Group By for the query. The OrderID is specified as a value. The Total cell for the column indicates that this field will be counted (as opposed to being summed, averaged, and so on).
Figure 12.25. A completed Crosstab query in Design view.
Notice the column labeled "Total of OrderID." This column displays the total of all the columns within the query. It is identical to the column containing the value except for the alias in the field name and that the Crosstab cell is set to Row Heading rather than Value.
Although you can create many of your Crosstab queries using the Crosstab Query Wizard, you should know how to build a Crosstab query without the wizard. This gives you the ability to modify existing Crosstab queries and to gain the ultimate control over the creation of new queries. To build a Crosstab query without the use of the Crosstab Query Wizard, follow 12 steps:
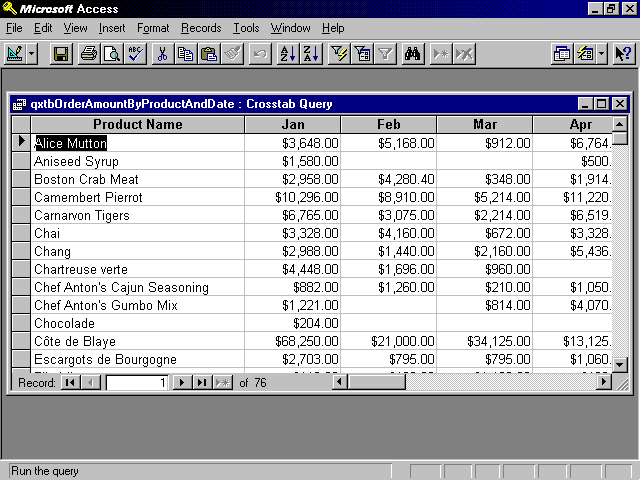
Figure 12.26 shows a query in which the column heading is set to the month of the OrderDate field. The row heading is set to the ProductName field. The sum of the TotalAmount field is the value for the query. The OrderDate is also included in the query grid as a WHERE clause for the query. Figure 12.27 shows the results of running the query.
Figure 12.26. A Crosstab query designed without the use of a wizard showing the total dollars sold by product and month.
Figure 12.27. The result of running a Crosstab query showing the total dollars sold by product and month.
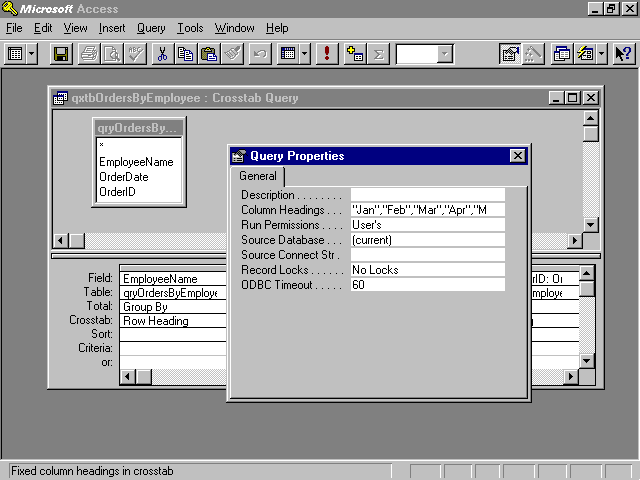
If you do not use fixed column headings, all the columns are included in the query output in alphabetical order. For example, if you include month names in the query result, they appear as Apr, Aug, Dec, Feb, and so on. By using fixed column headings, you tell Access the order in which each column appears in the query result. Column headings can be specified by setting the Column Headings property of the query (see Figure 12.28).
Figure 12.28. The Column Headings property of a query.
Regardless of how a Crosstab query is created, you should be aware of some special caveats when working with Crosstab queries:
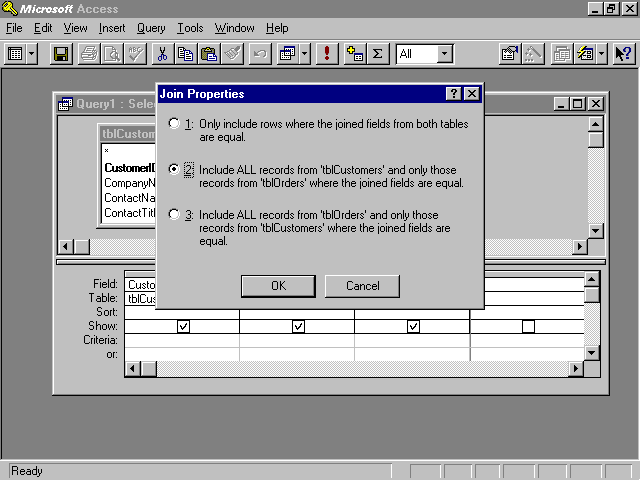
Outer Joins are used when you want the records on the one side of a One-to-Many relationship to be included in the query result regardless of whether matching records exist in the table on the many side of the relationship. Consider a customers table and an orders table. In many situations, the user will want to include only customers with orders in the query output. An Inner Join (the default join type) accomplishes this task. In other situations, the user will want all customers to be included in the query result whether they have orders or not. This is when an Outer Join is necessary.
To establish an Outer Join, you must modify the join between the tables included in the query:
Figure 12.29. Establishing a Left Outer Join.
The SQL statement produced when a Left Outer Join is established looks like this:
SELECT DISTINCTROW tblCustomers.CustomerID, tblCustomers.CompanyName

FROM tblCustomers

LEFT JOIN tblOrders ON tblCustomers.CustomerID = tblOrders.CustomerID;
A Left Outer Join can also be used to identify all the records on the one side of a join that do not have any corresponding records on the many side of the join. To do this, simply enter "Is Null" as the criteria for any field on the many side of the join (see Figure 12.30). In the query pictured in Figure 12.30, only customers without orders are displayed in the query result.
Figure 12.30. Query showing customers without orders.
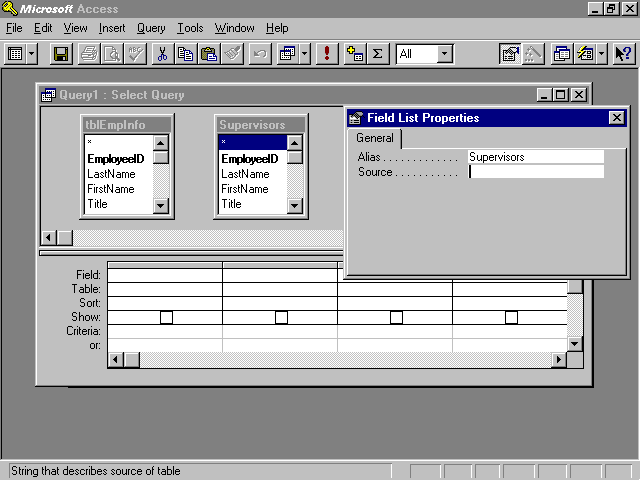
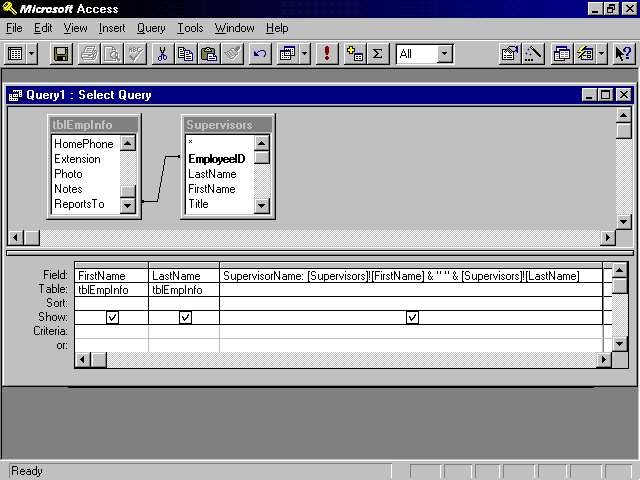
A Self-Join allows you to join a table to itself. This is often done so that information in a single table can appear to exist in two separate tables. The classic example is with employees and supervisors. Two fields are included in the employees table. One field includes the EmployeeID of the employee being described in the record. The other field specifies the EmployeeID of the employee's supervisor. If you want to see a list of employees and their supervisors, you'll need to use a Self-Join. To build a Self-Join query:
Figure 12.31. Building a self-join.
Figure 12.32. Establishing a self-join between the table and its alias.
Access SQL is the language that underlies Access queries, so you need to understand a little bit about Access SQL, where it came from, and how it works. Access SQL allows you to construct queries without using the Access QBE (Query By Example) grid. One instance when you'll need to do this is when you must build an SQL statement on-the-fly in response to user interaction with your application. Furthermore, certain operations supported by Access SQL are not supported by the graphical QBE grid. You must build these SQL statements in SQL view of the Query Builder.
SQL is a standard from which many varying dialects have emerged. It was invented at an IBM research laboratory in the early 1970s and first formally described in a research paper released in 1974 at an Association for Computing Machinery meeting. Access SQL is a dialect of SQL. It is a hybrid of the SQL-86 and SQL-92 standards.
At the very least, you need to understand the basic constructs of SQL. These constructs allow you to select, update, delete, and append data using SQL commands and syntax. SQL is actually made up of very few verbs. The most commonly used verbs are discussed in the next section.
SQL is easy to learn. When retrieving data, you simply build a SELECT statement. SELECT statements comprise various clauses that determine the specifics of how the data is selected. Once executed, SELECT statements select rows of data and return them as a recordset.
The SELECT clause is used to specify what columns you want to retrieve from the table(s) whose data is being returned to the recordset. The simplest SELECT clause looks like this:
SELECT *
This SELECT clause retrieves all columns from a table. Another example is
SELECT ClientID, CompanyName
This SELECT clause retrieves only the ClientID and CompanyName columns from a table. Not only can you include columns that exist in your table, you can include expressions in a SELECT clause. Here's an example:
SELECT ClientID, [City] & ", " & [State] & " " & [PostalCode] AS Address
This SELECT clause retrieves the ClientID column as well as a pseudo-column called Address that includes an expression that concatenates the City, State, and PostalCode columns.
The FROM clause is used to specify the table(s) or query(ies) from which the records should be selected. It can include an alias that you will use to refer to the table. The FROM clause looks like this:
FROM tblClients AS Clients
In this case, the name of the table is tblClients. The alias is Clients. If you combine the SELECT clause with the FROM clause, the SQL statement looks like this:
SELECT ClientID, CompanyName FROM tblClients
This SELECT statement retrieves the ClientID and CompanyName columns from the tblClients table.
The WHERE clause is used to limit the records that are retrieved by the SELECT statement. A WHERE clause can include up to 40 columns combined by the keywords AND and OR. A simple WHERE clause looks like this:
WHERE Country = "USA"
Using an AND to further limit the criteria, the WHERE clause looks like this:
WHERE Country = "USA" AND ContactTitle Like "Sales*"
This WHERE clause limits the records returned to those in which the country is equal to "USA" and the ContactTitle begins with "Sales." Using an OR, the SELECT statement looks like this:
WHERE Country = "USA" OR Country = "Canada"
This WHERE clause returns all records in which the country is equal to either "USA" or "Canada." Compare this with the following example:
WHERE Country = "USA" OR ContactTitle Like "Sales*"
This WHERE clause returns all records in which the country is equal to "USA" or the ContactTitle begins with "Sales." For example, the salespeople in China will be returned from this WHERE clause. The WHERE clause combined with the SELECT and FROM clauses looks like this:
SELECT ClientID, CompanyName FROM tblClients

     WHERE Country = "USA" OR Country = "Canada"
The ORDER BY clause determines the order in which the returned rows will be sorted. It is an optional clause and looks like this:
ORDER BY ClientID
The ORDER BY clause can include more than one field:
ORDER BY Country, ClientID
When more than one field is specified, the left-most field is used as the primary level of sort. Any additional fields are the lower sort levels. Combined with the rest of the SELECT statement, the ORDER BY clause looks like this:
SELECT ClientID, CompanyName FROM tblClients

     WHERE Country = "USA" OR Country = "Canada"

     ORDER BY ClientID
Often you'll need to build SELECT statements that retrieve data from more than one table. When building a SELECT statement based on more than one table, you must join the tables with a JOIN clause. The JOIN clause differs depending on whether you join the tables with an INNER JOIN, a LEFT OUTER JOIN, or a RIGHT OUTER JOIN. Here's an example of an INNER JOIN:
SELECT DISTINCTROW tblClients.ClientID,

     tblClients.CompanyName, tblProjects.ProjectName,

     tblProjects.ProjectDescription

     FROM tblClients

     INNER JOIN tblProjects ON tblClients.ClientID = tblProjects.ClientID
Notice that four columns are returned in the query result. Two columns are from tblClients and two are from tblProjects. The SELECT statement uses an INNER JOIN from tblClients to tblProjects based on the ClientID field. This means that only clients that have projects are displayed in the query result. Compare this with the following SELECT statement:
SELECT DISTINCTROW tblClients.ClientID,

     tblClients.CompanyName, tblProjects.ProjectName,

     tblProjects.ProjectDescription

     FROM tblClients

     LEFT JOIN tblProjects ON tblClients.ClientID = tblProjects.ClientID
This SELECT statement joins the two tables using a LEFT JOIN from tblClients to tblProjects based on the ClientID field. All clients are included in the resulting records whether or not they have projects.
The ALL clause of a SELECT statement means that all rows meeting the WHERE clause are included in the query result. When the DISTINCT keyword is used, Access eliminates duplicate rows, based on the fields that are included in the query result. This is the same as setting the Unique Values property to Yes in the graphical QBE grid. When the DISTINCTROW keyword is used, Access eliminates any duplicate rows based on all columns of all tables included in the query (whether or not they appear in the query result). This is the same as setting the Unique Records property to Yes in the graphical QBE grid.
The GROUP BY clause is used to calculate summary statistics. A GROUP BY clause is created when you build a Totals query using the graphical QBE grid. Consider the following example:
SELECT DISTINCTROW tblCustomers.Country, tblCustomers.City,

     Sum(tblOrders.Freight) AS SumOfFreight

     FROM tblCustomers

     INNER JOIN tblOrders ON tblCustomers.CustomerID = tblOrders.CustomerID

     GROUP BY tblCustomers.Country, tblCustomers.City
This SELECT statement returns the country, city, and total freight for each country/city combination. The GROUP BY clause indicates that detail for the selected records is not displayed. Instead, the fields indicated in the GROUP BY clause is displayed uniquely. One of the fields in the SELECT statement must include an aggregate function. This result of the aggregate function is displayed along with the fields specified in the GROUP BY clause.
A HAVING clause is similar to a WHERE clause but differs in one major respect: It is applied after the data is summarized rather than before. Consider the following example:
SELECT DISTINCTROW tblCustomers.Country, tblCustomers.City,

     Sum(tblOrders.Freight) AS SumOfFreight

     FROM tblCustomers

     INNER JOIN tblOrders ON tblCustomers.CustomerID = tblOrders.CustomerID

     GROUP BY tblCustomers.Country, tblCustomers.City

     HAVING (((Sum(tblOrders.Freight))>1000))
In the example, the criteria > 1000 will be applied after the aggregate function SUM is applied to the grouping.
You can practice entering and working with SQL statements in two places:
Let's take a look at both of these techniques.
A great place to practice writing SQL statements is in the SQL View window of a query. It works like this:
SQL statements can also be executed directly from VBA code. You can run an SQL statement from VBA code in a couple of ways:
The VBA language allows you to build a query on-the-fly, execute it, and never store it. The code looks like this:
Sub CreateTempQuery()

    Dim db As DATABASE

    Dim qry As QueryDef

    Dim rst As Recordset

    Set db = CurrentDb

    Set qry = db.CreateQueryDef("", _

        "Select ProjectID, ProjectName FROM tblProjects " _

        & "Where ProjectTotalEstimate > 30000")

    Set rst = qry.OpenRecordset()

    Do Until rst.EOF

        Debug.Print rst!ProjectID & " - " & rst!ProjectName

        rst.MoveNext

    Loop

End Sub
Working with recordsets is covered extensively in Chapter 15, "What Are Data Access Objects and Why Do You Care." For now, you need to understand that this code creates a query definition using an SQL statement. Because the first parameter of the CreateQueryDef method of the database object is set to a zero-length string, the query definition is never added to the database. Instead, the SQL statement is executed but never stored.
An SQL statement can also be used as part of the OpenRecordset method of the database. The code looks like this:
Sub OpenRSWithSQL()

    Dim db As DATABASE

    Dim rst As Recordset

    Set db = CurrentDb

    Set rst = db.OpenRecordset("Select ProjectID, " _

        & "ProjectName FROM tblProjects " _

        & "Where ProjectTotalEstimate > 30000", _

        dbOpenDynaset)

    Do Until rst.EOF

        Debug.Print rst!ProjectID & " - " & rst!ProjectName

        rst.MoveNext

    Loop

End Sub
Again, this code is discussed more thoroughly in Chapter 15. Notice that the OpenRecordset method of the database object receives two parameters: The first is a SELECT statement, and the second is a constant that indicates what type of recordset you are opening.
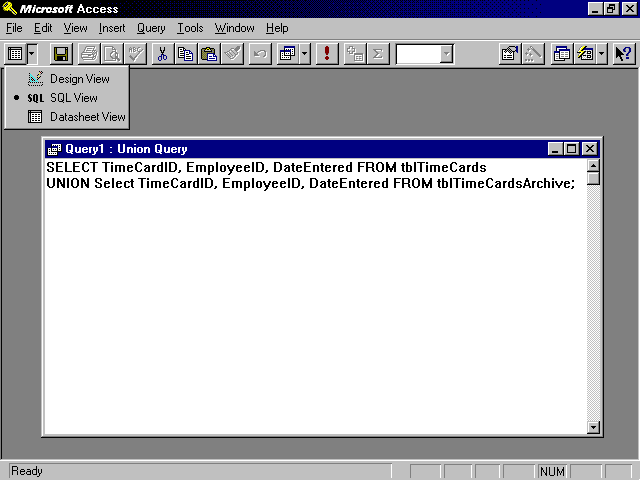
A Union query allows you to combine data from two tables with similar structures. Data from each table is included in the output. For example, say you have a tblTimeCards table and a tblTimeCardsArchive table. The tblTimeCards table contains active time cards, and the tblTimeCardsArchive table contains archived time cards. The problem occurs when you want to build a report that combines data from both tables. To accomplish this task, you must build a Union query as the record source for the report:
Figure 12.33 An example of a Union query that joins tblTimeCards with tblTimeCardsArchive.
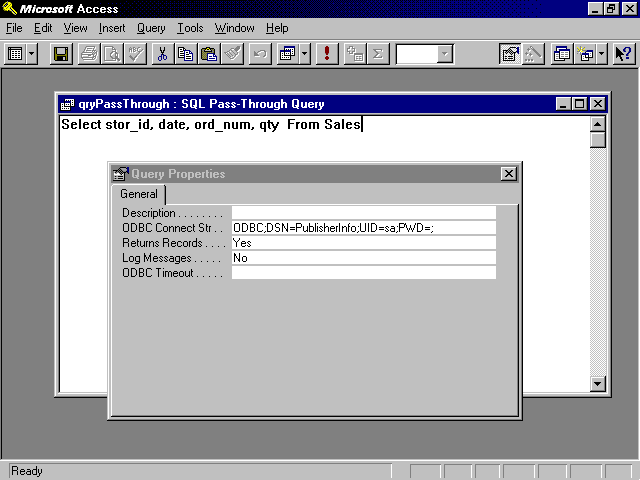
Pass-Through queries allow you to send uninterpreted SQL statements to your back-end database when you are using something other than Jet. These uninterpreted statements are in the SQL specific to your particular back-end. Although the Jet database engine sees these SQL statements, it makes no attempt to parse or modify them. Pass-Through queries are used in several situations:
Although Pass-Through queries provide many advantages, they are not a panacea. Pass-Through queries have a few disadvantages:
Now that you know all the advantages and disadvantages of Pass-Through queries, let's learn how to build one:
Figure 12.34. The SQL Pass-Through query that selects specific fields from a table called Sales that resides within a data source called PublisherInfo.
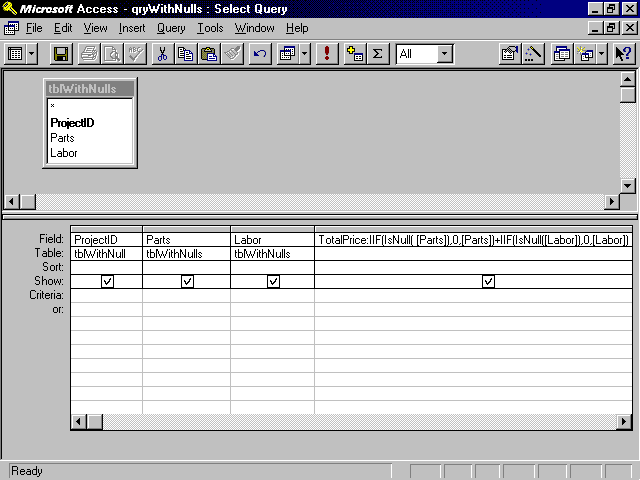
Null values can wreak havoc with your query results because Null values propagate. Consider the query pictured in Figure 12.35. Notice that when parts and labor are added, and either the parts or labor field contains a Null, the result of the addition of the two fields is Null. Figure 12.36 rectifies the problem. Notice the expression that adds the two values:
TotalPrice:IIF(IsNull([Parts]),0,[Parts]+IIF(IsNull([Labor]),0,[Labor])
This expression uses the IIF function to convert the Null values to zero before the two field values are added together.
Figure 12.35. Propagation of Nulls in a query result.
Figure 12.36. Solution to eliminate propagation of Nulls.
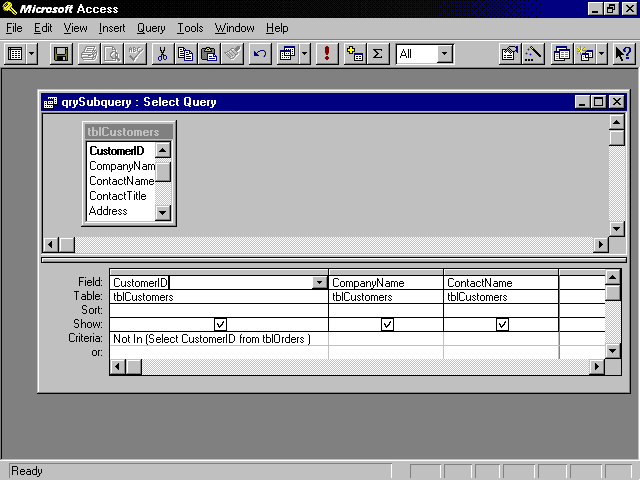
Subqueries allow you to embed one SELECT statement within another. By placing a subquery in the criteria of a query, you can base one query on the result of another. Figure 12.37 shows an example. The query pictured finds all the customers without orders. The SQL statement looks like this:
SELECT DISTINCTROW tblCustomers.CustomerID,

     tblCustomers.CompanyName, tblCustomers.ContactName

     FROM tblCustomers

     WHERE (((tblCustomers.CustomerID) Not In (Select CustomerID from _

     tblOrders )))
This query first runs the SELECT statement Select CustomerID from tblOrders. It uses the result as criteria to the first query.
Figure 12.37. A query containing a subquery.
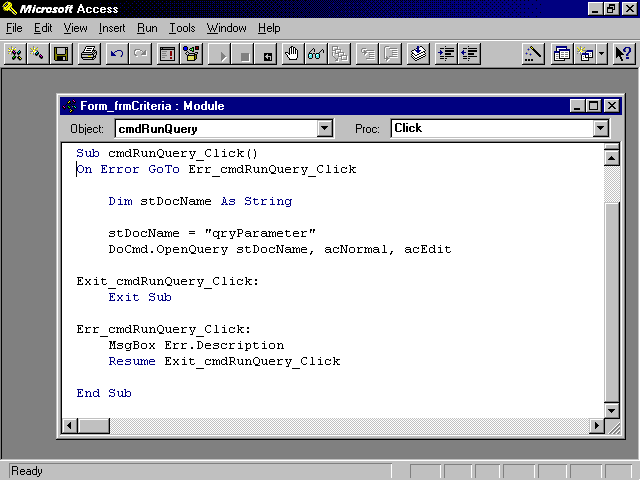
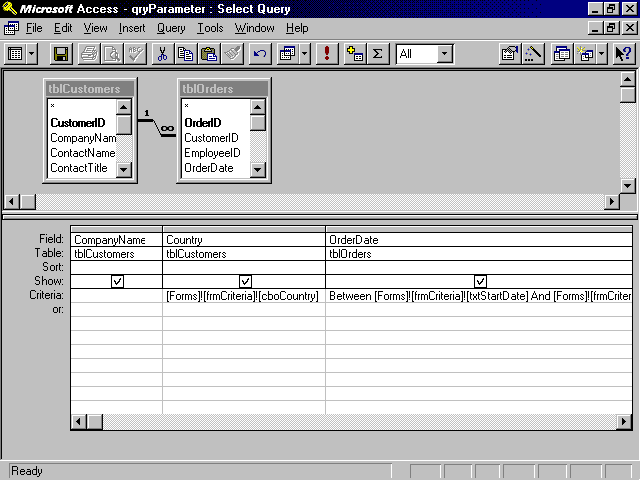
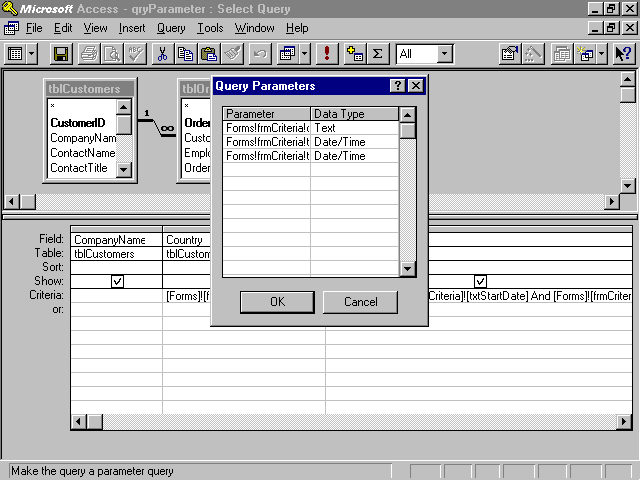
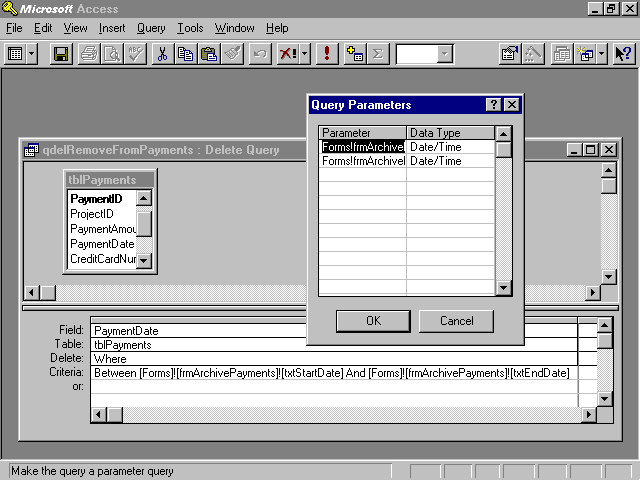
The biggest frustration with Parameter queries occurs when multiple parameters are required to run the query. The user is confronted with multiple dialogs, one for each parameter included in the query. The following steps explain how to build a Parameter query that receives its parameter values from a form:
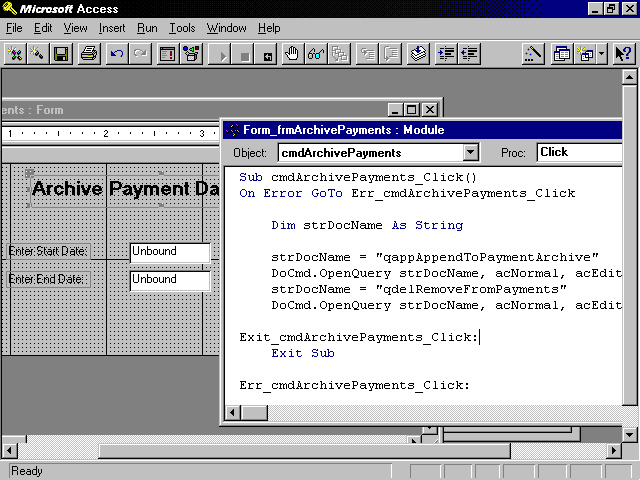
Figure 12.38. The command button that calls the Parameter query.
Figure 12.39. Parameters that refer to controls on a form.
Figure 12.40. The Parameters dialog allows you to select the data type for each parameter in the query.
The advanced query techniques you have learned will be used throughout the creation of the Time and Billing application. Let's take a look at several practical applications of the advanced techniques you have learned.
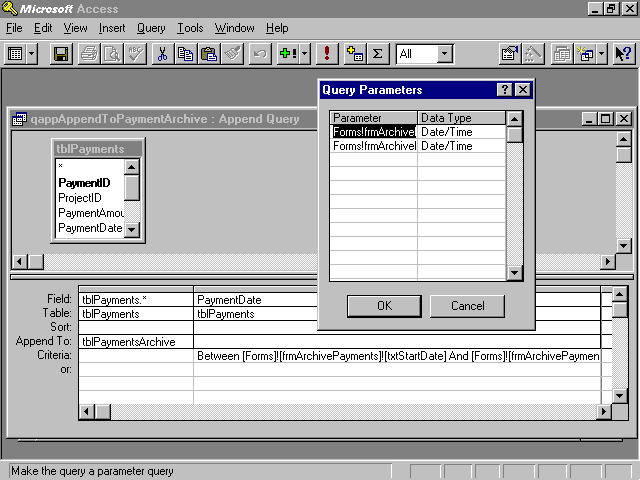
After a while, it might be necessary to archive some of the data within the tblPayment table. Two queries will act to archive the payment data. The first query, called qappAppendToPaymentArchive (see Figure 12.41) is an Append query that sends all data within a specified date range to an archive table called tblPaymentsArchive. The second query, called qdelRemoveFromPayments (see Figure 12.42), is a Delete query that deletes all the data that was archived from the tblPayments table. The archiving process will be run from a form called frmArchivePayments, where the date range can be specified by the user at runtime (see Figure 12.43).
Figure 12.41. The Append query qappAppendToPaymentArchive.
Figure 12.42. The Delete query qdelRemoveFromPayments.
Figure 12.43. The form that provides criteria for archive process.
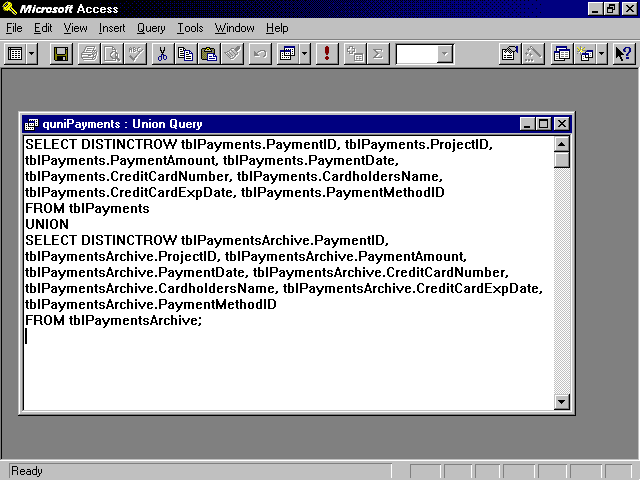
At times you might want to combine data from both tables. To accomplish this task you'll need to create a Union query that joins tblPayments to tblPaymentsArchive. The design of the query is pictured in Figure 12.44.
Figure 12.44. Union of tblPayments to tblPaymentsArchive.
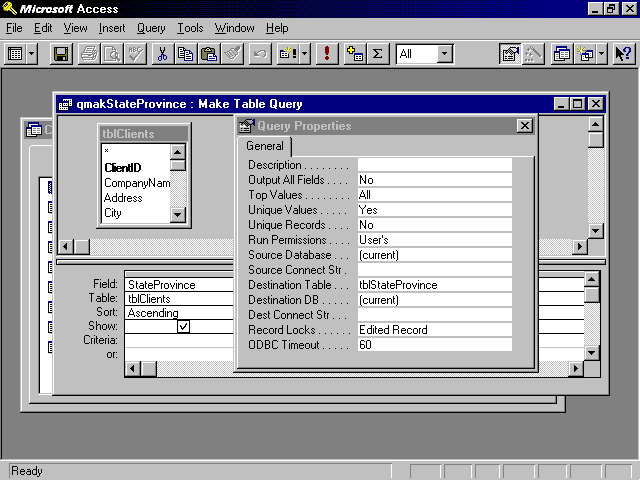
Because you'll regularly be looking up the states and provinces, you want to build a unique list of all the states and provinces that your clients are currently located in. The query required to accomplish this task is pictured in Figure 12.45. The query uses the tblClients table to come up with all the unique values for the StateProvince field. The query is a Make Table query that takes the unique list of values and outputs it to a tblStateProvince table.
Figure 12.45. A Make Table query that creates a tblStateProvince table.
As you can see, Microsoft provides a sophisticated query builder that allows you to construct complex and powerful queries. Action queries allow you to modify table data without writing code. These highly efficient queries can be used to add, edit, or delete table data. The Unique Values and Top Values properties of a query offer you much flexibility in determining exactly what data is returned in your query result.
Many things can be done to improve the efficiency of your queries. A small amount of attention to a few details covered in this chapter can provide dramatic improvements in the performance of your application.
Other special types of queries covered in this chapter include Crosstab queries, Outer Joins, and Self-Joins. Whatever cannot be accomplished using the graphical QBE grid can be accomplished by typing the required SQL statement directly into the SQL View window. The SQL View window allows you to type Access SQL statements or to use SQL Pass-Through to type SQL statements in the dialect of SQL specific to your back-end database.
![]()
![]()
![]()
![]()
![]()