| home Java Script MS Access Perl HTML Delphi C ++ Visual Basic Java CGIPerl MS Excel Front Page 98 Windows 98 Ms Word Builder PHP Assembler Link to us Links |
![]()
![]()
![]()
![]()
![]()
After you design and develop a sophisticated application, you should ensure that the integrity of the application and the data that it maintains are not violated. Microsoft Access gives you several options for securing your database. These options range from a very simple method of applying a password to the entire database, to applying varying levels of security to each and every object in the database. The more intricate your security solution, the more difficult it is to implement. Fortunately, you can tailor the complexity of the security you implement to the level of security required by each particular application.
The simplest, yet least sophisticated, method of implementing security is to assign a password to the overall database. This means that every person wanting to gain access to the database must enter the same password. When access has been obtained to the database, all of the database's objects are available to the user. This type of security is referred to as share-level security.
Share-level security is the simplest and quickest security to set up. With almost no effort, the database and its objects are secured. This method of security is quite adequate for a small business where the users of the database want to ensure that no unauthorized people can obtain access to the data, but each person who does have access to the database has full access to all of its objects.
To assign a database password, follow these steps:
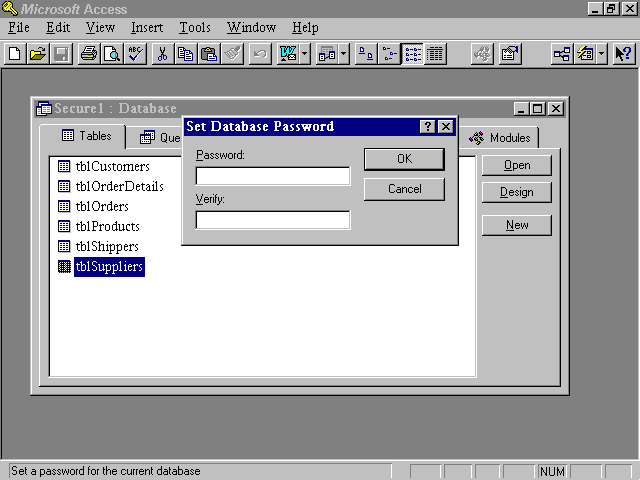
Figure 30.1. The Set Database Password dialog.
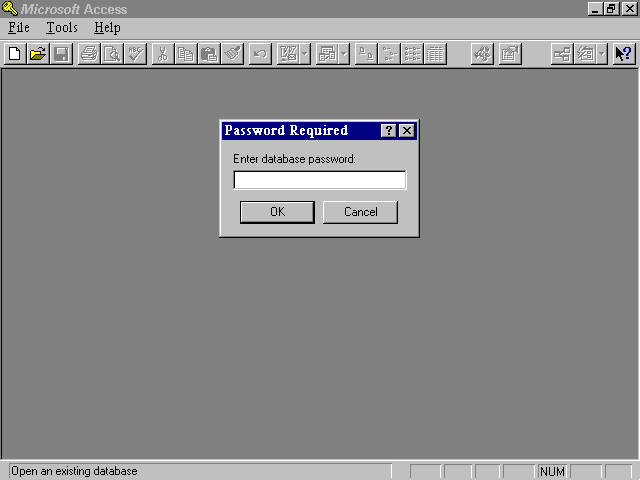
After you have assigned a password to a database, users are prompted for a password each time they open the database. The Password Required dialog appears each time the database is opened (see Figure 30.2).
Figure 30.2. The Password Required dialog.
When the user has entered the valid password, she gains access to the database and all of its objects. In fact, the user can even remove the password by selecting Tools|Security|Unset Database Password. The Unset Database Password dialog only requires that you know the original password (see Figure 30.3).
Figure 30.3. The Unset Database Password dialog.
The preceding paragraphs outline all there is to know about setting a database password. Although it's extremely easy to understand and implement, it is also extremely unsophisticated. As you can see, a user either has or does not have access to the database, and it is very easy for any user who has access to the database to modify or unset its password.
Before moving on to the more sophisticated methods of securing a database, it is important that you understand what any method of security does and does not provide for you. No matter how well you learn about and implement the techniques in this chapter, you will not be protected against someone attempting to read the data contained in your database. It is important that you are aware that even after you secure a database, someone with a disk editor can view the contents of the file. Although the data within the file will not appear in an easy-to-read format, the data is there and available for unauthorized individuals to see.
You might be feeling discouraged and asking yourself, "Why bother with security?" Do not despair! Fortunately, Access enables you to encrypt a database. The encryption process renders the data within the database indecipherable from word processors, disk utilities, and other products that are capable of reading text. When a database is encrypted, no one can decipher any of its data.
A database can be encrypted using the standard Access menus or by writing a VBA subroutine. In either case, the database that you are encrypting must not be open. To encrypt a database using Access's standard menus, follow these steps:
When you encrypt a database, the entire database (not just the data) is encrypted. As you access the data and the objects within the database, Access needs to decrypt the objects so that the user can use them and then encrypt them again when the user is done accessing them. Regardless of the method of encryption that you employ, the encrypted database degrades performance by about 15 percent. Furthermore, encrypted databases usually cannot be compressed by most disk compression software utilities because compression software usually relies upon repeated patterns of data. The encryption process is so effective at removing any patterns that it renders most compression utilities ineffective. You need to make a decision as to whether this decrease in performance and the inability to compress the database file is worth the extra security that encryption provides.
For most business environments, share-level security is not sufficient. Therefore, it is necessary to take a more sophisticated approach toward securing the objects within your database. User-level security enables you to grant specific rights to users and groups within a workgroup. This means that each user or group can have different permissions on the same object. With this method of security, each user begins by entering a user name and password. The Jet engine validates the user name and password and determines the permissions associated with the user. Each user maintains his or her own password, which is unrelated to the passwords of the other users.
With this method of security, users belong to groups. Rights can be assigned at the group level, the user level, or both. A user inherits the rights of his or her least-restrictive group. This is highlighted by the fact that security is always on. By default, all users get rights to all objects because every user is a member of the group called Users. This group is, by default, given all rights to all objects. If you have not implemented security, all users are logged on as the Admin user, who is a member of the Users group. The Jet engine determines that the Admin user has no password and therefore does not display an opening logon screen. Because members of the Users group by default get rights to all objects, it appears as if no security is in place.
With user-level security, you can easily customize and refine the rights to different objects. For example, one set of users might be able to view, modify, add, and remove employee records. Another set of users might be able to view only employee information. The last group of users might be allowed no access to the employee information, or they might be allowed access only to specific fields (such as name and address). The Access security model easily accommodates this type of scenario.
The major steps to implementing user-level security include the following:
The first step to establishing user-level security involves setting up a workgroup. Then you can define groups and users who belong to that workgroup and assign rights to those groups and users. Before you learn how to create groups and users, it is important for you to understand that groups and users are defined only in the context of a specific workgroup. Think of a workgroup as a group of users in a multiuser environment who share data and applications.
As mentioned in the previous section, user and group security information is stored in a Workgroup Information File. The default name for this file is System.mdw. Each application database is associated with a specific Workgroup Information File. It is the combination of the information stored in the Workgroup Information File and the information stored in the database that grants or denies individual users access to the database or to the objects within it. Multiple databases can share the same Workgroup Information File. The Workgroup Information File contains the following:
A SID is a machine-generated binary string that uniquely identifies each user or group. The system database contains the names and SIDs of the groups and users that are members of that particular workgroup and, therefore, share a system database.
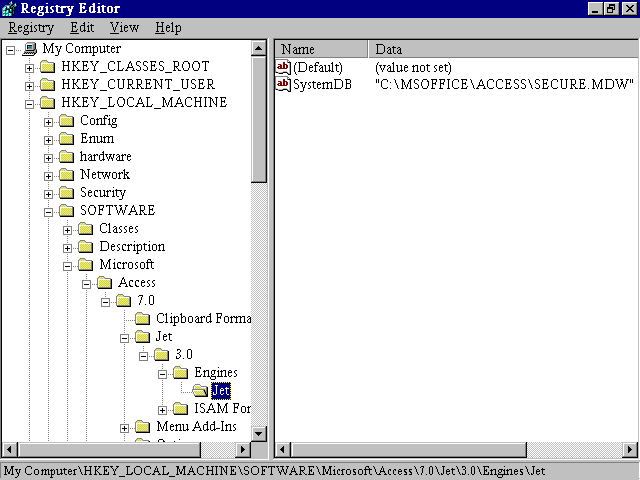
Actually, you can create many Workgroup Information Files. The name of the Workgroup Information File currently being used is stored in the Windows registry. You can view it under the HKEY_LOCAL_MACHINE in a key called \HKEY_LOCAL_MACHINE\SOFTWARE\Microsoft\Access\7.0\Jet\3.0\Engines\Jet (see Figure 30.4).
Figure 30.4. Viewing the current System Information File in the Window's Registry.
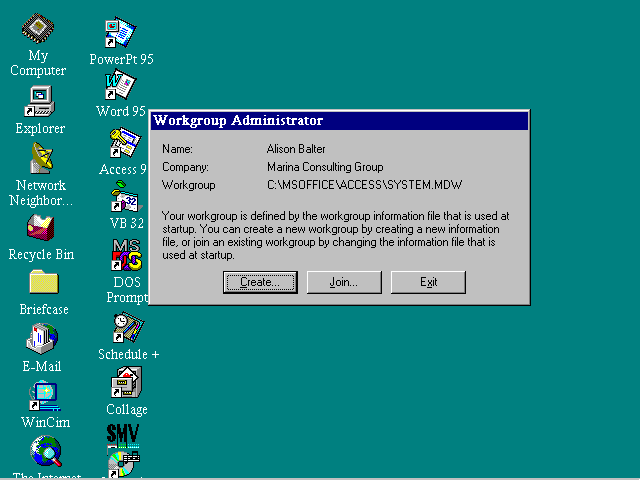
To establish a new workgroup, you must use the Workgroup Administrator. The Workgroup Administrator is a separate program that you execute outside Microsoft Access. Under Windows NT, you can access the Workgroup Administrator by selecting the Microsoft Access Workgroup Administrator icon in the Microsoft Access program group. Under Windows 95, you must choose Run from the Start menu and browse to find the Wrkgadm.exe file. Of course, you can add a desktop shortcut to execute this file.
Upon entering the Workgroup Administrator, you are presented with the Workgroup Administrator dialog (see Figure 30.5).
Figure 30.5. The Workgroup Administrator.
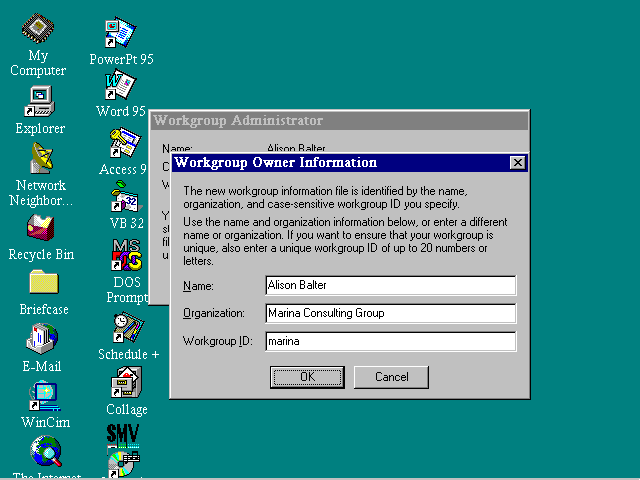
From the Workgroup Administrator dialog, you can create a new workgroup, or you can join one of the existing workgroups. If you select Create, you are presented with the Workgroup Owner Information dialog pictured in Figure 30.6.
Figure 30.6. The Workgroup Owner Information dialog.
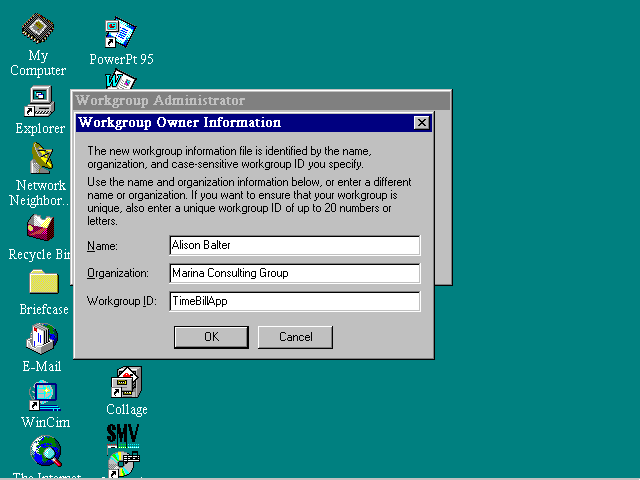
From the Workgroup Owner Information dialog, you can enter a name, an organization, and a case-sensitive workgroup ID that will be used to uniquely identify the workgroup to the system. If you do not establish a unique workgroup ID, your database is not secure. As you will see, anyone can find out your name and organization. If you do not establish a workgroup ID, anyone can create a new system information file with your name and company, rendering any security that you implement totally futile.
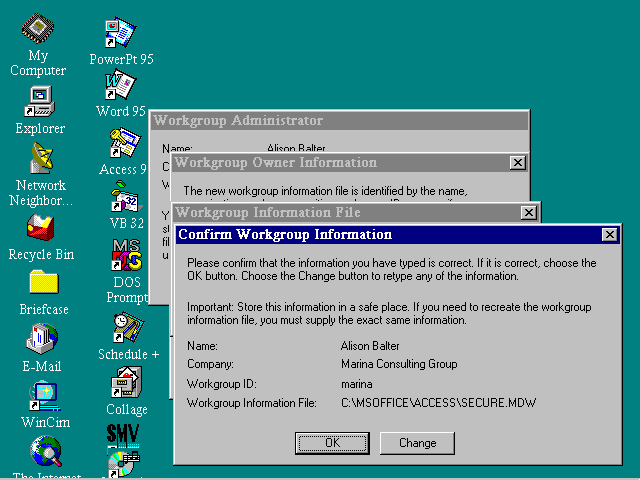
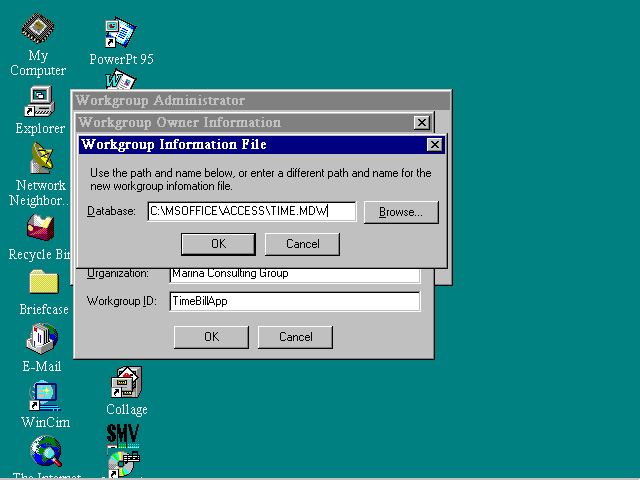
It is important that you record and store all workgroup information in a very safe place, so that you can re-create it in the case of an emergency. After entering the workgroup owner information, click OK. You are prompted for the name and location of the Workgroup Information File. The Workgroup Information File dialog is pictured in Figure 30.7.
Figure 30.7. The Workgroup Information File dialog.
The Workgroup Information dialog enables you to enter the name and location of the workgroup file. After you type the name of a new workgroup file and click OK, you are asked to confirm the information (see Figure 30.8). You are given one final opportunity to change any of the information. Click OK to confirm the information. Next, you are notified that the workgroup has been successfully created. You can then click Exit to close the workgroup administrator.
Figure 30.8. The Confirm Workgroup Information dialog.
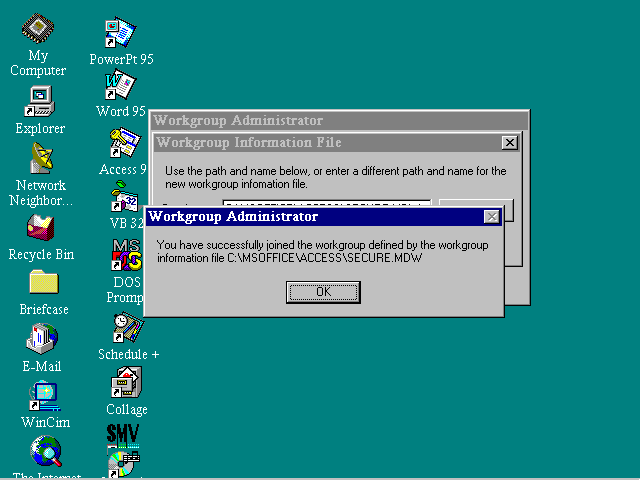
If different groups of users within your organization work with entirely different applications, you might find that it is appropriate to create multiple Workgroup Information Files. In order to access a database that has been properly secured with a specific Workgroup Information File, the database must be accessed while the user is a member of that workgroup. If the same user requires access to more than one database, each associated with a different Workgroup Information File, it might be necessary for the user to join a different workgroup. This can be accomplished using the Workgroup Administrator. To join a different workgroup, follow these steps:
Figure 30.9. Confirmation that a workgroup was successfully joined.
When you have joined a workgroup, you are ready to create users and groups. You accomplish this from within Microsoft Access. Access comes with two predefined groups: the Admins group and the Users group. The Admins group is the system administrator's group account. This group automatically contains a member called Admin. Members of this group have the irrevocable power to modify user and group memberships and clear user passwords, so anyone who is a member of the Admins group is all-powerful within your system. The Admins group must contain at least one member at all times.
It is extremely important to create a unique workgroup ID from within the workgroup administrator. This was covered earlier in the "Establishing a Workgroup" section of this chapter. Otherwise, members of other workgroups can create their own workgroup file and grant themselves permissions to your database's objects. Furthermore, it is important to ensure that the Admin user does not own any objects and is not given any explicit permissions. Because the Admin user is the same across all workgroups, all objects that Admin owns or has permissions to are available to anyone using another copy of Microsoft Access or Visual Basic.
The system also comes with a predefined Users group. This is the default group that is composed of all user accounts. All users are automatically added to the Users group and cannot be removed from this group. The Users group automatically gets all permissions to all objects. As with the Admin user, the Users group is the same across all workgroups. It is therefore extremely important that you take steps to remove all rights from the User's group, thereby ensuring that the objects in the database are properly secured.
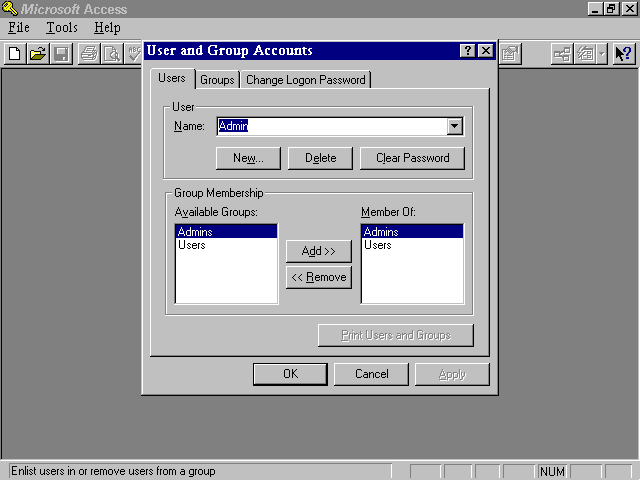
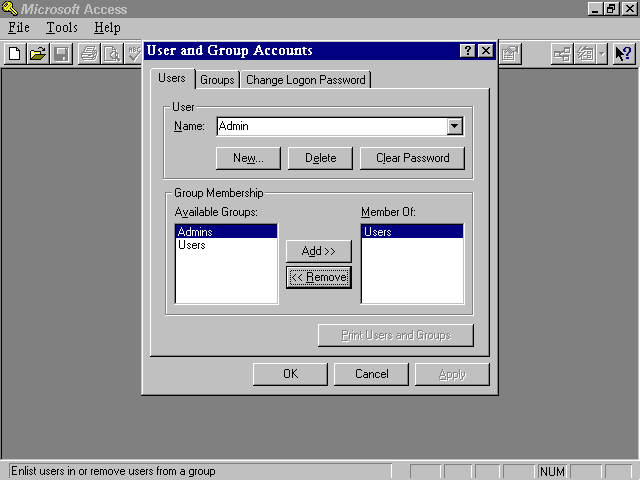
The first step in this process is to create a new user who will be the administrator for the database. To accomplish this, select Tools|Security|User and Group Accounts. It does not matter which database you are in when you do this. It is only important that you are a member of the proper workgroup. Remember that you are defining Users and Groups for the workgroup, not for the database. The User and Group Accounts dialog appears, as shown in Figure 30.10.
Figure 30.10. The User and Group Accounts dialog.
The User and Group Accounts dialog enables you to create and delete users and assign their group memberships. It also enables you to create and delete groups and invoke a logon password for Microsoft Access. It is important to understand that even if you access this dialog from within a specific database, you are setting up users and groups for the entire workgroup. This means that if you assign a password while you are a member of the standard SYSTEM.MDW workgroup, and others on your network share the same System Workgroup File, you will be extremely surprised when everyone on your network gets prompted with a logon dialog when they attempt to launch Microsoft Access. If you do not want this to occur, you must create a new System Workgroup File before establishing security.
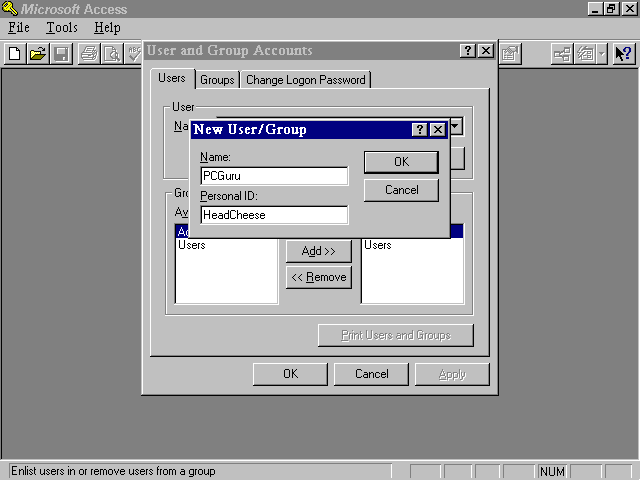
When you are sure that you are a member of the correct workgroup and are viewing the User and Group Accounts dialog, you are ready to create a new user who will administrate your database. To establish a new administrative user, click New. The New User/Group dialog appears, as shown in Figure 30.11.
Figure 30.11. The New User/Group dialog.
The New User/Group dialog enables you to enter the user name and a unique Personal ID. This Personal ID is not a password. The user name and Personal ID combine to become the encrypted SID that uniquely identifies the user to the system. Users create their own password when they log onto the system.
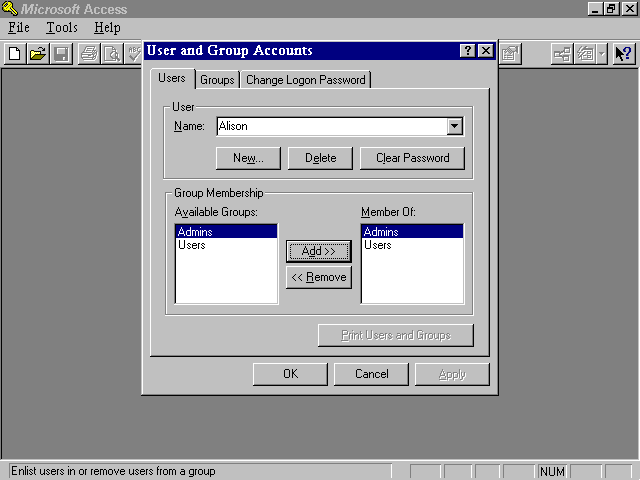
The next step is to make the new user a member of the Admins group. To do this, click Add with the new user selected from the User drop-down. The new user should appear as a member of the Admins group (see Figure 30.12).
Figure 30.12. Adding the new user to the Admins group.
After creating the new user and making her a member of the Admins group, you are ready to change the logon for the workgroup by adding a password for the Admin user. This is necessary so that Access will prompt you with a Logon dialog when you launch the product. If Admin has no password, the Logon dialog never appears. Without a Logon dialog, you will never be able to log on as the new user that you just defined.
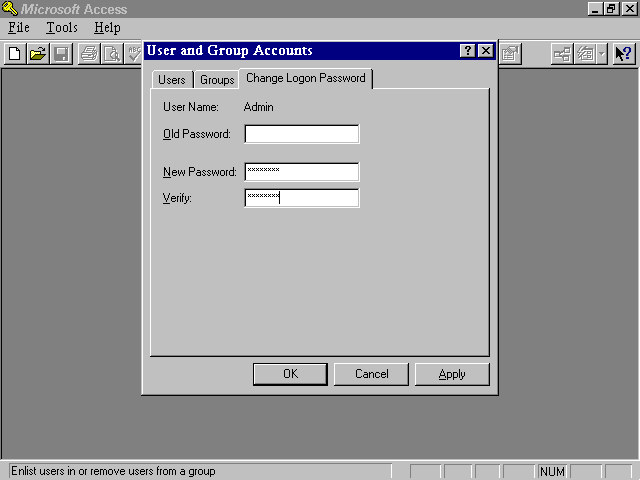
To change the password for the Admin user, click on the Change Logon Password tab of the User and Group Accounts dialog. The User and Group Accounts dialog appears as shown in Figure 30.13.
Figure 30.13. The Change Logon Password dialog.
Assign a new password and verify it. (There is no old password unless you think of the old password as blank.) Then click Apply. This establishes a password for the Admin user. You cannot establish a password for the new user that you just defined until you log on as that user.
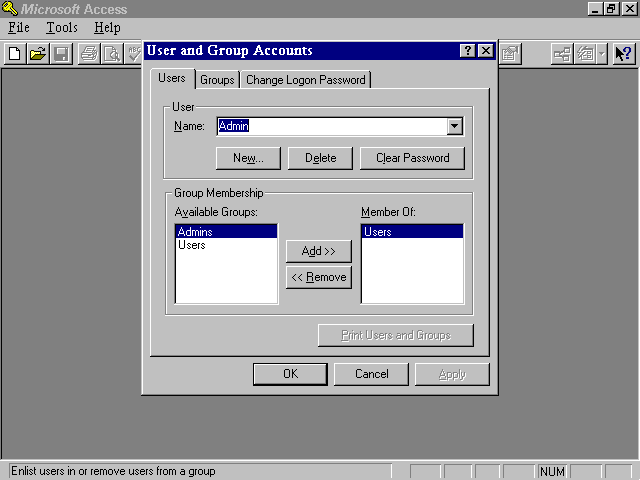
Before you exit and reload Access, you should remove Admin from the Admins group. Remember that the Admin user is the same in every workgroup. Because the Admins group has all rights to all objects in the database (including the right to assign and remove permissions to other users and objects), if you do not remove Admin from the Admins group, your database will not be secure. To remove the Admin user from the Admins group, follow these steps:
Figure 30.14. Removing Admin from the Admins group.
You are now ready to close the User and Group Accounts dialog and exit Access. Click OK. Exit Access and attempt to run it again. You are prompted with the Access Logon dialog pictured in Figure 30.15.
Figure 30.15. The Access Logon dialog.
Log on as the new system administrator. You do not have a password at this point; only the Admin user has a password. At this point, it still does not matter which database is open.
After you have logged in as the new administrator, you should first modify your password. To do this, select Tools|Security|User and Group Accounts. Click the Change Logon Password tab. Remember that you can only assign a password for the user that you are logged on as.
After all of this work, you are finally ready to actually secure the database. Up to this point, it did not matter which database you had open. Everything that you have done thus far has applied to the workgroup rather than to a particular database. Open the database that you want to secure. At the moment, the Admin user owns the database and members of the Users group have rights to all objects within the database.
The first thing that you should do to secure the database is to use the Security Wizard. The Security Wizard revokes the rights from all users and groups except for the user that is currently logged on. It also creates a copy of the database in which the ownership of the database and all of its objects are transferred to the user who is currently logged on.
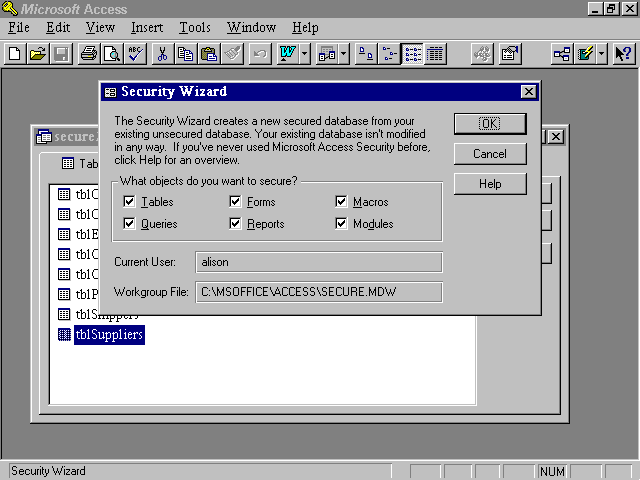
To run the Security Wizard, select Tools|Security|User Level Security Wizard. The Security Wizard dialog appears, as shown in Figure 30.16.
Figure 30.16. The Security Wizard dialog.
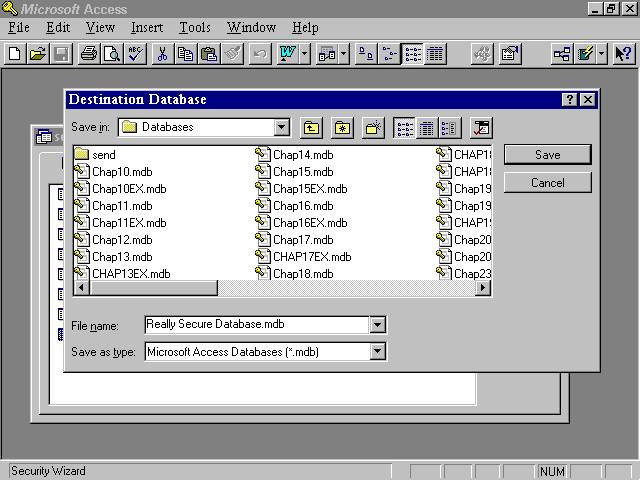
In the Security Wizard dialog, you select the objects that you want to secure. Notice that you can secure all objects, or you can opt to secure just tables, queries, forms, reports, macros, or modules. After you click OK, you are prompted for the name of the secured database (see Figure 30.17). The owner of a database cannot be changed. The owner of a database always has rights to everything in the database. Because Admin is the owner of the database and Admin is the same in all workgroups, Access must copy all of the database objects to a new, secure database that is owned by the new user. Access in no way modifies the existing, unsecured database. Type a name for the new secure database. Click Save. Access creates the new database, copies all of the objects to the new database, and removes all rights from all objects for the Users group in the new database. When the process is completed the dialog shown in Figure 30.18 appears.
Figure 30.17. The Destination Database dialog.
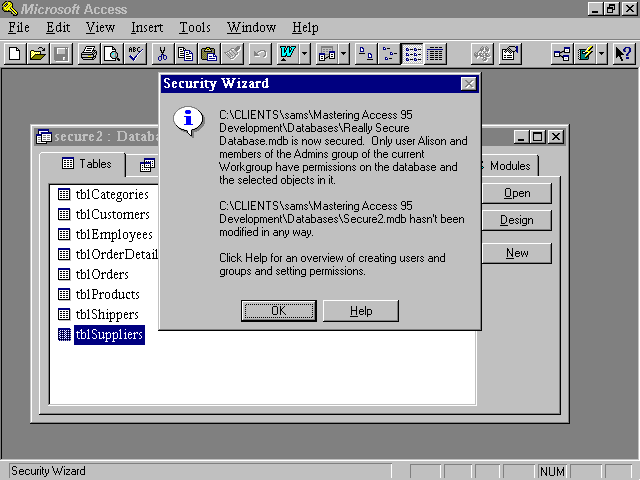
Figure 30.18. A successfully completed Security Wizard process.
The Security Wizard dialog warns you that the new database has been secured and that the original database has not been modified in any way. The new database is owned by the new system administrator. All rights have been revoked from the users group.
When you have established and joined a workgroup, you are ready to establish the users and groups who will be members of the workgroup. Users represent individual people who will access your database files. Users are members of groups. Groups are categories of users that share the same rights. Rights can be assigned at either the user level or the group level. It is easier administratively to assign all rights at the group level. This involves categorizing access rights into logical groups and then assigning users to those groups.
If groups have been set up properly, the administration of the system is greatly facilitated. If rights of a category of users need to be changed, they can be changed at a group level. If a user is promoted and needs additional rights, you can make that user a member of a new group. This is much easier than trying to maintain separate rights for each user.
Users and groups can be added, modified, and removed using front-end interface tools, as well as through VBA code. This chapter covers how to maintain users and groups using the front-end interface tools. Chapter 30, "Complex Security Issues," covers how to maintain users and groups using code.
Regardless of how you choose to define groups and users, you generally should create groups and then assign users to the appropriate groups. It is important to think through the design of the organization as well as your application before you begin the mechanical process of adding the groups and users.
To add a new group, follow these steps:
To add, delete, and modify users through the user interface, follow these steps:
Before you proceed with the final step, assigning rights to users and groups, you should make each user a member of the appropriate group. A user can be a member of as many groups as you choose, but remember that each user gets the rights of his or her most forgiving group. In other words, if a user is a member of both the Admins group and a group with read-only access to objects, the rights of the Admins group will prevail. To assign each user to the appropriate groups, follow these steps:
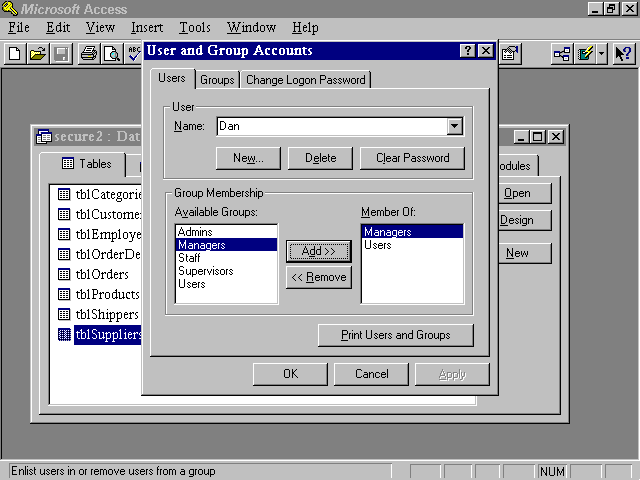
Figure 30.19 shows a user named Dan who has been added to the Managers group.
Figure 30.19. Assigning a user to the appropriate group.
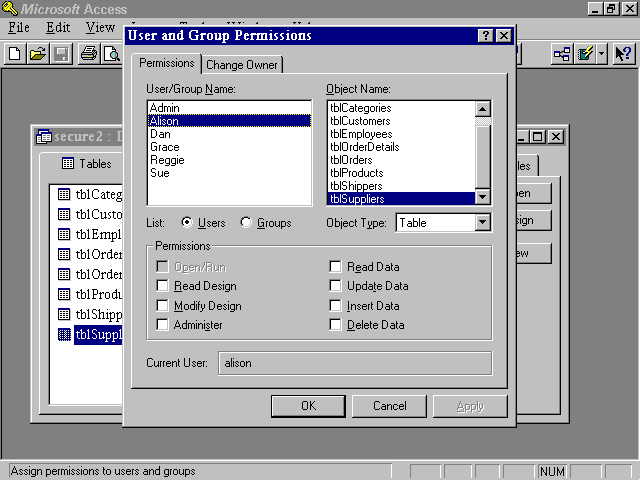
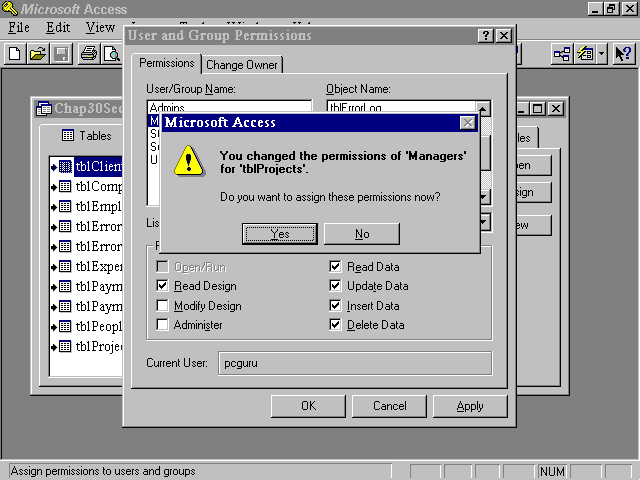
So far, you have created groups and users, but you haven't given any of your groups or users rights to objects in the database. The key is to assign specific rights to each group, and then make sure that all users are members of the appropriate groups. After that, you can assign each group specific permissions to the objects within your database. User and group information is maintained in the system database; permissions for objects are stored within system tables in the application database (MDB) file. After you have established a workgroup of users and groups, you must assign rights to specific objects in your database by following these steps:
Figure 30.20. The User and Group Permissions dialog.
In order to assign permissions appropriately, it is important that you understand the types of permissions that are available in addition to what each type of permission allows the user to do. The types of permissions available are as follows:
Some of the preceding permissions implicitly include associated permissions. For example, a user cannot update data in a table if she does not have the rights to read the data and the design of the table within which that data is located.
Although the discussion of security thus far has been quite thorough, a couple of issues surrounding the basics of security have not yet been covered. They include additional issues with passwords, understanding how security works with linked tables, understanding and working with object ownership, and printing security information. These topics are covered in the sections that follow.
When you create a user, no password is assigned to the user. Passwords can be assigned to a user only when that user has logged onto the system. The system administrator cannot add or modify a user's password. It is important to encourage users to assign themselves a password the first time that they log onto the system. Using VBA code, the users can be forced to assign themselves a password. This is covered in Chapter 31.
Although you cannot assign a password to a user or modify the user's password, you can remove a user's password. This is necessary when a user forgets his or her password. Here is how to clear a user's password:
When you have designed your application with two databases (one for tables and the other for the remainder of the application objects), it is necessary for you to secure both databases. Securing only the linked tables is not sufficient!
A potential problem still exists. If a user has access to add, delete, and modify data from within your application, that user can open the database containing the data tables from outside your application and modify the data without going through the forms and reports that you have designed. One solution to this problem is to revoke all rights from the tables. Base all forms and reports on queries that have the Run Permissions property set to Owner's. This provides users with the least opportunity to modify the data from outside of your system. The Run With Owner's Rights property is covered in Chapter 30.
Remember that the user that creates the database is the database's owner. This user retains irrevocable rights to the database. You cannot change the owner of a database; you can only change the ownership of objects within the database. You can, in effect, change the owner of the database if you have rights to its objects, by creating a new database and importing all of the objects from the other database. This is automatically accomplished by the Security Wizard.
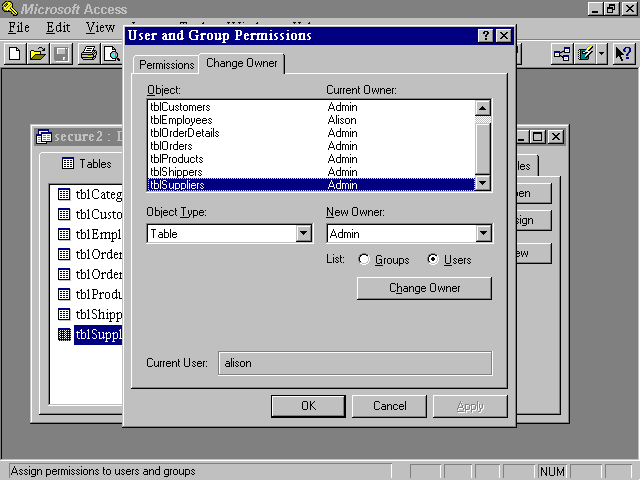
By default, the creator of each object within the database is its owner. To change the ownership of an object within the database, follow these steps:
Figure 30.21. Changing an object's ownership.
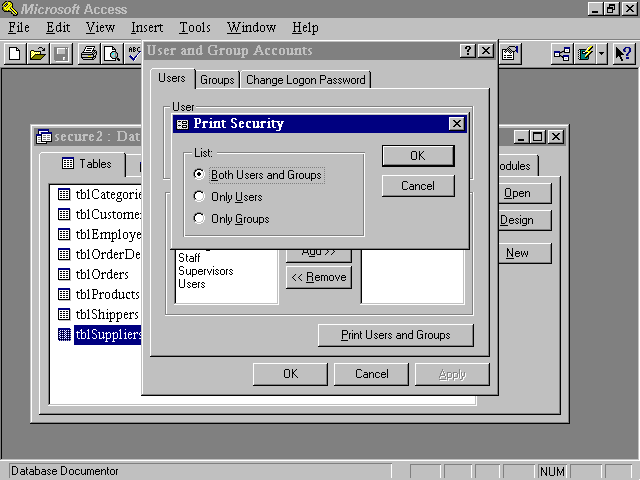
A list of each user and the groups that she is a member of can be printed quite easily by following these steps:
Figure 30.22. The Print Security dialog.
Now that you have learned the steps involved in properly securing an Access database, you can apply the steps to the Time and Billing application.
Figure 30.23. The Workgroup Owner Information dialog enables you to enter information for a new workgroup.
Figure 30.24. The Workgroup Information File dialog enables you to specify a name and path for a new Workgroup Information file.
Figure 30.25. The New User/Group dialog enables you to enter the Name and Personal ID of a new User.
Figure 30.26. The Users tab of the User and Group Accounts dialog enables you to add a user to a group.
Figure 30.27. The Users tab of the User and Group Accounts dialog enables you to remove a user from a group.
Figure 30.28. This dialog appears when you forget to apply rights to an object before moving to the next object.
Don't forget that if the tables are linked, you need to go into the linked database to secure those tables.
The security system in Access 95 is quite robust but also somewhat complex. Using Access security, you can fully secure a database and all of its objects. As a developer, you might want to prevent people from modifying the objects within your database. Furthermore, you might want to restrict certain users from viewing certain data, using specific forms, or running certain reports.
This chapter walked you through all of the steps required to properly secure a database. It began by showing you how to set up a database password and how to encrypt a database. It then covered all of the details of implementing user-level security.
Invoking user-level security first involves setting up a workgroup using the Workgroup Administrator. You must then create an administrative user and make that user a member of the Admins group. Next you change the password for the Admin user and remove the Admin user from the Admins group. Exit Access and log on as the system administrator. Assign yourself a password. All of these steps were covered in detail in this chapter. In addition, this chapter walked you through the process of using the Security Wizard to change the owner of the database from Admin to the new administrator and revoke all permissions from the Users group. This ensures that the database is truly secure. The final step is to assign permissions for groups and/or users to the objects that reside within your newly secured database. The chapter also covered this very powerful process.
![]()
![]()
![]()
![]()
![]()