| home Java Script MS Access Perl HTML Delphi C ++ Visual Basic Java CGIPerl MS Excel Front Page 98 Windows 98 Ms Word Builder PHP Assembler Link to us Links |

![]()
![]()
![]()
Delphi comes with several tools to aid in your application development. Today you learn about some of Delphi's tools. Specifically, you learn about the following:
First, you take a general look at these tools. Then you learn how to add your own tools to the Delphi Tools menu. The day ends with a look at the Delphi Environment Options dialog box.
NOTE: In addition to the tools listed here, Delphi also comes with a host of database tools such as Database Desktop, BDE Administrator, SQL Builder, and SQL Explorer. A discussion of those tools would be too lengthy for today's purposes.
The Delphi Image Editor is a tool that enables you to create and edit bitmaps (.bmp), icons (.ico), and cursors (.cur). You can also create a resource project containing multiple bitmaps, icons, and cursors in a single resource file (.res). The resource file can then be added to your Delphi project, and you can use the resources as needed. Figure 11.1 shows the Image Editor editing a bitmap.
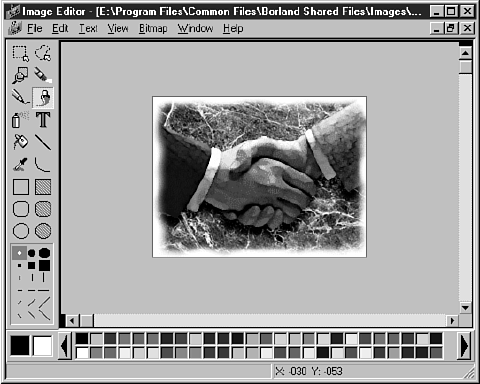 FIGURE 11.1. The
Image Editor.
FIGURE 11.1. The
Image Editor.
NOTE: All Windows images are bitmaps, whether they are actual Windows bitmap files (.bmp) or icons or cursors. In this chapter, I refer to all images collectively as bitmaps.
Image Editor deals only with Windows bitmap files. Other file formats such as PCX, TIFF, JPEG, and GIF are not supported.
You can start the Image Editor by either double-clicking on the Image Editor icon in the Delphi folder or choosing Tools|Image Editor from the Delphi main menu. The Image Editor is a stand-alone program and doesn't have to be run from the Delphi IDE.
The Image Editor enables you to create 2-color, 16-color, and, in the case of bitmap files, 256-color images. You can choose any available colors when drawing on a bitmap. In the bottom-left corner of the Image Editor are two boxes containing the current foreground and background colors. (The foreground color is represented by the far left box.)
When using a drawing tool, you can draw with either the foreground color or the background color. To draw with the foreground color, use the left mouse button. For example, if you choose the filled rectangle tool and draw a rectangle on the bitmap, the rectangle will be filled with the foreground color. To draw a filled rectangle with the background color, use the right mouse button to drag the rectangle. The same is true for most of the other drawing tools.
NOTE: The Text tool uses only the foreground color. You cannot place text with the background color. If you want to use the background color, you have to change the foreground color and then place your text.
To change the foreground color, click a color on the color palette with the left mouse button. (The color palette is located along the bottom of the Image Editor window.) When you choose a new foreground color, the square that represents the foreground color changes to show the new color selected. To change the background color, click a color in the color palette with your right mouse button.
NOTE: If you are editing a 256-color image, the color palette will have scroll buttons on either side so that you can scroll through the available colors.
The colors that appear in the color palette are determined by the bitmap when you are loading a bitmap that already exists. If you are starting a new 256-color image, the default 256-color palette is used.
You can also set the foreground or background colors with the Eyedropper tool. The Eyedropper enables you to set the foreground or background color by picking up a color that is already used on the image.
To set the foreground color with the Eyedropper, choose the Eyedropper tool from the Tools palette, place the tip of the Eyedropper over a portion of the image that has the color you want to use, and then click the left mouse button. The foreground color changes to the color under the Eyedropper. To set the background color, click with your right mouse button instead of the left mouse button. The Eyedropper tool is invaluable when you want to exactly match a color that was previously used on your bitmap.
NOTE: The foreground and background colors might work differently in the Image Editor than in other bitmap editors you have used. For example, in some bitmap editors, the outline of a filled rectangle is drawn with the foreground color and filled with the background color. With the Image Editor, filled objects have no discernible border. A filled rectangle is in either the foreground or the background color.
In the case of icons and cursors, you can also choose the transparent color (the word color being relative here). When you use the transparent color, the background beneath the icon shows through wherever the transparent color is used. That could mean the Windows background in the case of a shortcut, or it could mean the title bar of your application.
Whether you use the transparent color depends on your personal tastes and the particular icon you are creating. In the case of cursors, you will almost always use the transparent color as the background for the icon. Rarely do you have a cursor that appears as a solid block.
Choosing the inverted color causes the background underneath the icon to be inverted (like reverse video). Use of the inverted color isn't common, but it is there if and when you need it.
Both the transparent and inverted colors are shown next to the color palette when editing icons and cursors. They are represented by color squares with a curved line running through them.
NOTE: By default, new icon and new cursor resources have the background filled with the transparent color.
The Image Editor drawing tools are similar to most paint programs. Because these are common drawing tools, I'm not going to go over each and every one. Fifteen minutes of experimentation with the Image Editor will be more beneficial than anything I can tell you. Fire up the Image Editor and experiment with it for a while. I'll wait.
At the top of the Image Editor Tools palette, you find the Marquee and Lasso tools. These work in essentially the same way, so I'll cover them together. Both tools enable you to select a region on the current image. The Marquee tool is used to define a rectangular region. Choose the Marquee tool and then drag a bounding rectangle on the image. When you stop dragging, a marquee is drawn around the region to mark it. The Lasso tool works in much the same way but enables you to define a freehand region. A Lasso region is filled with a hatch pattern to identify it.
TIP: When using the Lasso tool, you don't have to close the region. When you release the mouse button, the Image Editor automatically closes the region by drawing a connection line between the start point and the end point.
When a region is defined, you can cut or copy the image within the region and paste it somewhere else on the image or to another image you are working on (you can have multiple bitmaps open at one time). When you choose Edit|Paste from the main menu, the image within the marquee is placed in the upper-left corner of the bitmap with a marquee around it. The pasted image can now be dragged into position.
When you place your mouse cursor within the marquee, the cursor changes to a hand. When you see the hand cursor, you can drag the bitmap within the marquee to another location and drop it. You can continue to move the bitmap until you have it positioned exactly where you want it. After you have the bitmap where you want it, click again on the image outside the marquee and the bitmap within the marquee merge into the existing image.
TIP: The Image Editor has a shortcut method of cut and paste. Create a Marquee or Lasso region, place your mouse cursor inside the region, and drag. The image within the region moves as you drag.
When you cut a region or move it by dragging, the current background color will fill the area that the image originally occupied. The background shows through the hole created by the cut operation.
TIP: You can copy portions of one bitmap to another using cut and paste. First, open both images in the Image Editor. Place a marquee around the portion of the original image you want to copy and then choose Edit|Copy from the main menu. Switch to the other image and choose Edit|Paste from the main menu. Move the pasted image as needed.
NOTE: If you have a marquee selected when you paste, the pasted image will shrink or stretch to fit the size of the marquee.
The Eraser tool works just the opposite of the other tools in regard to the left and right mouse buttons. With the Eraser, the left mouse button draws with the background color and the right mouse button draws with the foreground color.
The Text tool enables you to place text on the image. The text is drawn using the current text settings. The text settings can be changed by clicking the Text item on the main menu. Here you can set the text alignment (left, right, or centered) or the font (typeface). To change the typeface, choose Text|Font from the main menu. Now you can choose a new typeface or make the font bold, italic, underlined, and so on.
The other drawing tools are self-explanatory. As I said earlier, a little time behind the wheel of the Image Editor will teach you just about everything you need to know about those tools.
TIP: When drawing rectangles, you can press and hold the Shift key to force a rectangle to a square. Likewise, you can draw a perfect circle by choosing the Ellipse or Filled Ellipse tool and holding the Shift key as you drag. Using the Shift key with the Line tool enables you to draw straight lines (vertical, horizontal, or 45-degree angles).
The Image Editor enables you to zoom in so that you can work on your bitmaps up close and personal. You can zoom either by using the Zoom tool or via the View menu. To zoom in on a particular part of your image using the Zoom tool, first select the Zoom tool from the Tools palette and then drag a bounding rectangle around the portion of the image you want to magnify. The magnification will change depending on the size of the rectangle you created when you dragged. You can now see well enough to change fine details in your bitmap.
To zoom using the menu, choose View|Zoom In or press Ctrl+I. When you choose Zoom In from the menu, the image is magnified by a predetermined amount. To zoom out again using the menu, choose View|Zoom Out (Ctrl+U) or View|Actual Size (Ctrl+Q).
When you are creating a cursor or an icon, the Image Editor shows a split view. Figure 11.2 shows an Image Editor window while creating an icon.
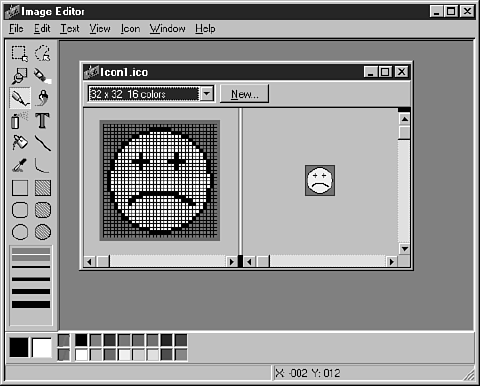 FIGURE 11.2.Editing
an icon.
FIGURE 11.2.Editing
an icon.
Although you can zoom either side of the split window, you will usually work with a zoomed-in copy on the left side and an actual-size image on the right, as shown in Figure 11.2.
The Line Width palette is displayed directly below the Tools palette. Depending on the currently selected tool, the Line Width palette might show line widths or brush shapes that you can choose. To pick a line width, click one of the five widths displayed. Subsequent drawing operations will use the new line width until you change it. Similarly, to change a brush shape, just click the brush shape you want to use. If you refer to Figure 11.1, you will see the Line Width palette showing brush shapes.
You can create a bitmap from scratch or load an existing bitmap and modify it. To open an existing bitmap file, choose File|Open from the main menu (bitmap files have a BMP extension). To create a new bitmap file, choose File|New from the main menu and then choose Bitmap File from the pop-up menu. The Bitmap Properties dialog box is displayed, as shown in Figure 11.3.
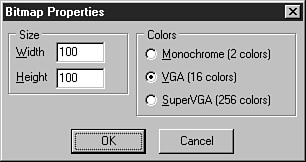 FIGURE 11.3. The
Bitmap Properties dialog box.
FIGURE 11.3. The
Bitmap Properties dialog box.
Here you can set the initial size of the bitmap (in pixels) as well as the color depth. You can create a 2-color, 16-color, or 256-color bitmap.
NOTE: The Image Editor does not support bitmaps of more than 256 colors.
Select the size and color depth you want and click OK. A blank bitmap is displayed in an editor window. Do any drawing you want on the bitmap. When you are finished editing, choose File|Save or File|Save As to save the bitmap file to disk.
Any time you are working with a bitmap file, the Image Editor main menu has a menu item called Bitmap. This menu has a single item under it called Image Properties. Choosing Bitmap|Image Properties displays the Bitmap Properties dialog box just as when you create a new bitmap file. The Bitmap Properties dialog box enables you to change the size and color depth of the bitmap. Select a new width, height, or color depth and click OK.
NOTE: There is one difference in the Bitmap Properties dialog box when it is displayed for an existing bitmap as opposed to when you're creating a new bitmap. When displayed for an existing bitmap, the Bitmap Properties dialog box has a check box labeled Stretch. This is used by the Image Editor when changing the bitmap size. If the Stretch option is off, the bitmap will not be stretched (either larger or smaller) when the bitmap size is changed. If the Stretch option is on, the bitmap will be stretched to fill the new bitmap size. Stretching a bitmap is an inexact science, so sometimes the results of stretching are less than perfect.
All in all, there isn't much to working with bitmap files. Although the Image Editor is fine for simple bitmaps, you will probably not find it adequate for sophisticated graphics. If you need high-quality bitmaps, you might consider purchasing a full-featured image-editing package or hiring a computer artist to create your bitmaps.
TIP: Don't forget to check online sources for computer-graphic artists. These people know their craft far better than all but the most gifted programmers and are often very reasonable in their pricing. Repeat this 10 times: "I am a programmer, not an artist." (Okay, maybe some of you are doubly blessed.)
Creating icons is also an art form, but icons are not quite as demanding as full-color bitmaps. Most of the time you can create your own icons, but great-looking icons still require skill. If you flip back to Figure 11.2, you will see an icon as it is displayed in the Image Editor while editing.
TIP: Load icon files from any source you can find and zoom in on them to get tips on how the best-looking icons are created. Creating 3D icons takes practice (and is something I never get quite right).
An icon in 32-bit Windows is actually two icons in one. The large icon is 32¥32 pixels. The large icon can be placed on a dialog box such as an About box. It is also the icon that Windows uses when creating a shortcut to your application. In addition, the large icon is used by Windows Explorer when the file list view is set to display large icons.
The small icon is 16¥16 pixels and is the icon used by Windows on the title bar of your application, on the Windows taskbar, in the File Open dialog box, and in Windows Explorer when the view is set to small icons. Both the large and the small icons are stored in the same icon file (.ico).
NOTE: You don't have to supply both a large icon and a small icon. If you supply only the large icon, Windows will shrink the large icon when it needs to display a small icon. Sometimes, however, the results are not quite what you expect and might not be good enough quality for your tastes. In those cases, you can also create the small icon so that you are in control of how your application looks, rather than rely on Windows to do the right thing.
Creating a New Icon Resource
To create a new icon resource, choose File|New from the main menu and then choose Icon from the pop-up menu. When you create a new icon in the Image Editor, you see the Icon Properties dialog box, as shown in Figure 11.4.
 FIGURE 11.4. The
Icon Properties dialog box.
FIGURE 11.4. The
Icon Properties dialog box.
This dialog box enables you to choose the icon you are creating (either the large or the small icon) and the number of colors to use for the icon. The default is to create the standard icon (the large icon) and to use 16 colors. (In reality, 2-color icons are rarely used. When was the last time you saw one?)
NOTE: Even if you are creating both the large icon and the small icon, you must choose one or the other to start with. For example, if you are creating a new icon, you should start with the large icon. After creating the large icon, you can then create the small icon.
When you are editing an icon, the Image Editor menu bar has an item called Icon. The Icon menu has items called New, Delete, and Test. The New menu item enables you to create a new large or small icon. For example, if you had already created the large icon, you could choose Icon|New from the main menu to create the small icon.
TIP: The Icon Editor window has a button called New that also creates a new icon and is faster than using the main menu (refer to Figure 11.2).
When you choose New to create a second icon, the Icon Properties dialog box is displayed just as before. If you have already created the large icon, the small icon will be selected by default and all you have to do is click OK. The editor window will change to display the new, blank icon. The Image Editor will not let you create an icon that already exists in the icon file.
TIP: When both icons are present, you can switch between them using the combo box at the top of the Icon Editor window.
The Delete item on the Icon menu enables you to delete either the large or the small icon from the icon resource. You cannot delete the last icon in the icon resource.
The Test item on the Icon menu displays the Icon Tester dialog box, which shows you what the icon will look like when displayed. Figure 11.5 shows the Icon Tester dialog box in action.
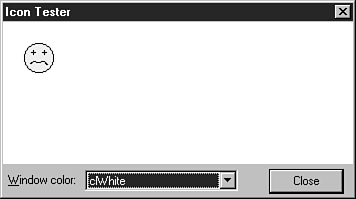 FIGURE 11.5. The
Icon Tester dialog box.
FIGURE 11.5. The
Icon Tester dialog box.
The Icon Tester enables you to change the background color so that you can view the effect that different backgrounds have on the appearance of your icon. If you are currently editing the large icon, the large icon appears in the Icon Tester. If you are currently editing the small icon, the Icon Tester dialog box displays the small icon.
Working with cursors is not much different than working with icons. A cursor has only two colors: white and black. (Multicolor and animated cursors are not supported by the Image Editor.) Draw the cursor as you want it to appear.
NOTE: A peculiarity of the Cursor Editor is that the transparent color is set to the color of your system's background color instead of the dark green color used for the Icon Editor. If you have your Windows background color set to a very light color, it can be difficult to see what is transparent and what is white. If you are having difficulty distinguishing the background color from white, set your Windows background color to a different value (such as dark green).
As when editing bitmap files and icons, the Image Editor menu displays a menu item called Cursor when you are editing a cursor. This menu item has two items: Set Hot Spot and Test.
The Set Hot Spot item enables you to specify the cursor's hot spot. The hot spot is the specific pixel of the cursor that Windows uses to report the mouse coordinates when your cursor is being used. For example, the hot spot on a crosshair cursor is the exact center of the crosshairs. For a pointer cursor, the hotspot is set to the tip of the arrow's point. To set the hot spot, choose Cursor|Set Hot Spot from the main menu. The Set Cursor Hot Spot dialog box appears, where you can enter the x and y coordinates of the hot spot.
TIP: You must enter the exact x and y coordinates for the hot spot. To make this easier, before setting the hot spot, place the editing cursor over the point on the cursor where you want the hot spot. The Image Editor status bar will display the x and y coordinates of the point under the cursor. Make note of the x and y coordinates, and then choose Cursor|Set Hot Spot from the main menu and enter those x and y coordinates.
The Test item on the Cursor menu gives you the opportunity to try out your new cursor. Choose Cursor|Test from the main menu and the Cursor Tester dialog box will be displayed, as shown in Figure 11.6.
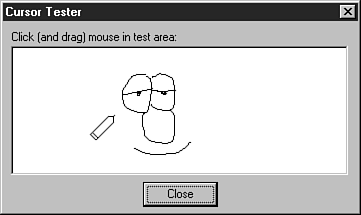 FIGURE 11.6. Testing
the cursor.
FIGURE 11.6. Testing
the cursor.
Hold down either mouse button to draw on the Cursor Tester window. If you haven't yet set the hot spot, you will probably notice that the hot spot is set to the upper-left corner of the cursor by default. You should always set the hot spot to a point on your cursor that will be logical to users of your application.
The Image Editor has context menus for each editing mode (Bitmap, Cursor, and Icon). You might recall that the right mouse button is used for drawing, so you can't bring up the context menus by clicking the mouse button while over the image. To display the Image Editor context menus, right-click when the cursor is within the editor window but outside the image. The context menus contain the same items found on the individual menus, as discussed in the previous sections.
Creating Resource Projects
The Image Editor also enables you to create a resource project file for storing all your bitmaps, icons, and cursors. To create a resource project, choose File|New from the main menu and then choose Resource File from the pop-up menu. A project window is displayed. The project window is a tree view control that shows the bitmaps, icons, and cursors in the project. Figure 11.7 shows the project window for a sample project.
 FIGURE 11.7. The
Image Editor project window.
FIGURE 11.7. The
Image Editor project window.
The project window has a context menu that can be used to create new resources, edit resources, rename resources, and delete resources. The items on the context menu are also duplicated on the main menu under the Resource menu item.
When you save the resource project, the Image Editor will compile it into a binary resource file (.res). You can then add the binary resource file to your Delphi project.
To create a new resource for your project, choose New from the project window context menu or Resource|New from the main menu.