| home Java Script MS Access Perl HTML Delphi C ++ Visual Basic Java CGIPerl MS Excel Front Page 98 Windows 98 Ms Word Builder PHP Assembler Link to us Links |
![]()
![]()
![]()
![]()
![]()
Access 95 is the first desktop database that ships with built-in replication capabilities. Replication is a powerful feature that is becoming increasingly important in today's world of mobile and distributed computing. This chapter teaches you about replication and how to implement it through both the user interface and code.
Data replication is the capability of a system to automatically make copies of its data in remote locations. Any changes to the original or to the copies are propagated to all other copies. Data replication enables users to make changes to data offline, at remote locations. Changes to either the original or the remote data are synchronized with other instances of the database.
A practical example of data replication involves a team of salespeople who are out on the road all day. At the end of the day, each salesperson logs on to one of the company's Windows NT servers via Dial Up Networking or RAS (Remote Access Services). Each salesperson's transactions are sent to the server. If you feel that it is practical and necessary, any changes to the server data are also sent to the salesperson. In addition to data being replicated, if the developers within the organization are busily adding forms, reports, and modules to the master copy of the database, any changes to the application components are also updated in the remote copies as users log onto the system.
The preceding example illustrates just one of the several valuable uses of replication. In a nutshell, data replication is used to improve the availability and integrity of data throughout an organization or enterprise. The practical uses of data replication are many. They can be categorized into five general areas which are explained in the following sections.
In today's global economy, it is the norm for companies to have many offices distributed throughout the country, or even the world. Prior to Access 95, it was difficult to implement an Access application that would support the sharing of data among multiple offices. With replication, each office gets a replica of the database. Periodically throughout the day, each office synchronizes its changes with corporate headquarters. How often the synchronization occurs depends upon the frequency required for data at each location to be current at any given moment in time.
The process of sharing data among dispersed users is illustrated by the salesperson example discussed earlier in the chapter. This implementation of replication generally involves mobile users who connect to the network after modifying data out on the road. Because only incremental changes are transferred from the Design Master to the replicas, and from the replicas to the Design Master, this form of replication makes the mobile computing scenario economically feasible.
Replication can be very effective in reducing network traffic loads. The Design Master can be replicated onto one or more additional servers. Distributed users can make changes onto one of the additional servers. This can serve to significantly improve performance by distributing the processing load throughout the network. Changes made to the data on the additional servers can be synchronized with the main server periodically during the day. How often synchronization occurs depends on the need for data to be current at any moment in time.
Replication provides you with an excellent vehicle for distributing application updates. Design changes can be made only to the Design Master. As users throughout the organization log on to synchronize with the Design Master, any structural changes to the application are sent to the user. This is much more efficient and effective than providing each user with an entirely new copy of the application database each time that a minor change is made to the schema of the application.
Many people do not think of replication as a means of backing up application data. Actually, replication is extremely well-suited for this task. Ordinarily, to back up an Access database, everyone must log off of the system. With replication, this is not the case. The synchronization process can occur periodically during the day while users are still logged on to the system. All changes are replicated. Not only is this more efficient than backing up the entire database, it also ensures that should a problem occur on one server, you could be quickly up and running on a backup server.
Despite the many positive aspects of replication, there are a couple of situations where replication is not appropriate. The first situation would be a situation in which data consistency is critical. If an application requires that data be current at every given moment in time, it is not a good candidate for replication. Another situation where replication is not effective is a situation where a large volume of existing records are modified throughout the day by many different users. In a situation like this, the process of resolving conflicts that occur when multiple users update the same record would not be practical.
Replication itself requires Microsoft Access 95 running under Windows 95 or Windows NT version 3.51 or higher. The major steps involved in the replication process include:
These steps can be accomplished in the following ways:
All of the steps involved in the replication process, and the alternatives for accomplishing each step, are covered in this chapter. An overview of each option is provided here.
The Access user interface provides a series of menu items that allow you to accomplish all of the steps that are part of the replication process. The Tools|Replication menu contains the following options: Create Replica, Synchronize Now, Resolve Conflict, and Recover Design Master. Accomplishing replication using these menu options is covered throughout this chapter.
The Windows 95 Briefcase has built-in support for the replication process. As you will see, a user can simply drag a database file to the Briefcase to replicate it, can make changes to the file while on the road, and can synchronize the replica with the Design Master when they reconnect to the network. This is all accomplished because when Access 95 is installed, it registers a special class ID with the Windows 95 Briefcase. When a database is dragged to the Briefcase, the Briefcase's Reconciler code is called. When the user selects Update Selection or Update All from the Briefcase menu, the Merge Reconciler is called. At the time of the writing of this book, Briefcase replication is available only through Windows 95 (although it is rumored to also be available whenever Windows NT 4.0 releases).
The Replication Manager is a sophisticated tool that ships as part of the Access Developer's Toolkit. It is a mandatory player in the replication process when you are managing a large number of replicas. In addition to providing basic replication functionality, the Replication Manager enables you to schedule the synchronization of replicas. In fact, the Replication Manager allows you to manage and intricately control all aspects of the replication process. The Replication Manager is covered in detail in the section of this chapter entitled "The Replication Manager."
In addition to all of the other ways that you can implement replication, most aspects of the replication process can also be accomplished using DAO code. DAO code can be used to make a database replicable, create and synchronize replicas, and to get and set properties of a replicable database. DAO can easily be integrated with the other methods of replication. Although requiring the most time and effort on your part, DAO code enables you to base the replication process on events rather than time, and to provide your users with a custom user interface for the replication process.
Visual Basic 4.0, Excel for Windows 95, and Visual C++ all support replication using data access objects. You cannot achieve replication with these products using either the Briefcase or the Access Developer's Toolkit. It is therefore easier to manage the replication process on a machine on which Access is installed.
Now that you know what replication is and what alternatives you have for implementing it, you are ready to learn about what makes it happen. Six major components are responsible for the replication process:
The Tracking Layer refers to the part of the Jet engine that is capable of tracking and recording all of the changes that occur to the Design Master and to each of the replicas. It is responsible for ensuring that changes are available to be transmitted to other replicas.
The Replication Manager provides the tools necessary to support the replication process. It can also be used to generate reports on synchronization activity.
If you use the Briefcase or the Access user interface to manage the replication process, Jet handles the exchange of information between the replicas. If you use the Replication Manager to manage the replication process, the Transporter is responsible for monitoring the changes and for handling the exchange of data between replicas.
When using the Replication Manager, each replica is assigned a transporter. The Transporter performs either direct or indirect synchronization between the members of a replica set. When the synchronization process is initiated, the Transporter attempts to make a direct connection with the target member of the replica set. If both members of the replica set can be opened simultaneously by the Transporter, direct synchronization occurs. With direct synchronization, changes from one member of the replica set are applied directly to the other member.
If the Transporter determines that the target replica set member is not available, indirect replication occurs. There are many reasons why the target replica set member might be unavailable. Potential reasons why a direct connection cannot be established include the following:
Regardless of the cause of an indirect synchronization, the Transporter for the first member of the replica set leaves a message for the Transporter assigned to the member of the replica set that is unavailable. This message is stored in a shared folder on the network. The shared folder acts as a drop-box location for the target member. All messages sent while a member of the replica set is unavailable are stored in the drop-box location.
The Transporter is configured through the Replication Manager user interface. It is covered in further detail in the section of this chapter entitled "The Replication Manager."
The File System Transport is responsible for providing messaging services to the Transporter.
The Briefcase Reconciler is another integral component of the replication architecture. As mentioned above, the Briefcase Reconciler ensures that a database is replicable and manages the merging of changes between the Briefcase replica and the Desktop replica.
Several Windows Registry entries are responsible for assisting with the replication process. A couple of them are shown in Figure 24.1. Notice the Replication Manager and Transporter subkeys under the HKEY_LOCAL_MACHINE\SOFTWARE\Microsoft\Jet\3.0 key. These entries contain important path information used by the Replication Manager and by the Transporter. The Briefcase Reconciler uses entries under HKEY_CLASSES_ROOT\CLSID.
Figure 24.1. Replication and the Windows Registry.
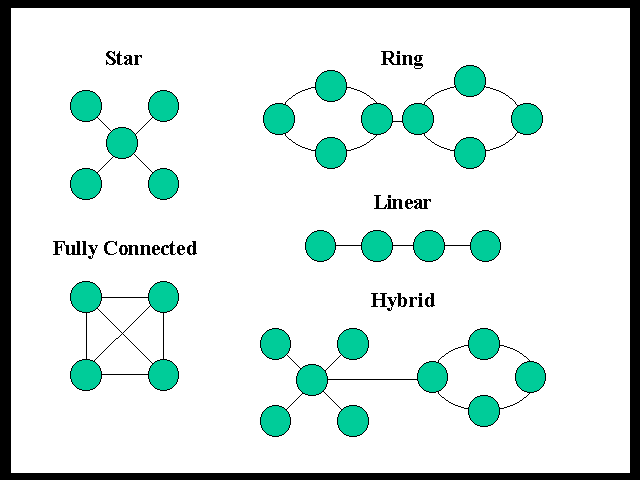
The topology for data synchronization determines which replicas synchronize with which. The topology is essentially a blueprint for how the changes are merged between the members of the replica set. Different topologies are appropriate for different situations. The topology that you select is determined by your business needs as well as by the design of your organization. The names of the synchronization topologies are Star, Ring, Fully Connected, Linear, and Hybrid. Each topology is shown in Figure 24.2.
Figure 24.2. Examples of replication topologies.
With the Star topology, a single hub periodically synchronizes with the rest of the replicas. The biggest advantage of this topology is simplicity and ease of programming. Another advantage of the Star topology is that data does not have to travel very far. Each replica synchronizes with only one other database, the hub. One disadvantage of the Star topology is that it is not particularly reliable. If the controlling replica is damaged or unavailable, the synchronization process cannot occur. Another disadvantage of the Star topology is that the first replica that synchronizes with the hub receives no data from the other replicas and the last replica that synchronizes with the hub receives all of the data from the other replicas. This problem can be circumvented by issuing two rounds of synchronization. Finally, the Star topology cannot be used with a large number of replicas. This is because all of the load is placed on the hub.
With the Ring topology, each computer synchronizes with the next computer in the replication chain. There is no central point of synchronization in this scenario. The major advantage of the Ring Topology is that the load is distributed throughout the satellite machines. The primary disadvantage is that because there is no central point of synchronization, it might take a long time for changes to be distributed throughout the replicas. Furthermore, if one of the replicas in the chain is damaged or unavailable, the replication process stops. This can be handled using code that senses the problem and bypasses the unavailable machine.
When the Fully Connected topology is used, every replica synchronizes with every other replica. This topology offers several advantages. Its strongest point is that it ensures that the data is the most current at any moment in time. This is because data is sent directly from each replica to all of the other replicas in the replica set. For this reason, it is the best solution in a situation where it is imperative that the data be as current as possible. Another benefit of the Fully Connected topology is that it achieves a high level of redundancy. Because of the low level of latency afforded by the Fully Connected topology, the impact of failure of any one of the replicas is minimal. The Fully Connected topology is not without its disadvantages. It requires the most overhead of any of the topologies. This is because of the amount of network traffic generated as each replica in the set synchronizes with all of the other replicas in the set. Furthermore, it is necessary to stagger the replication schedules. Otherwise, it is likely that collisions will occur as more than one replica attempts to synchronize with the same replica.
The Linear topology is similar to the Ring topology except that the chain is never completed. For this reason, the Linear topology has the highest level of latency, which means that at any moment in time it is likely for the data that a user looks at to not be current. The biggest advantage of the Linear topology is the low level of network traffic that is generated. It is not practical for most applications due to the amount of time that it takes for changes to reach all of the replicas in the set.
A Hybrid topology consists of any combination of the other topologies. In a complex application, it is usually not appropriate to use a single topology in isolation. By combining the topologies, you can achieve exactly the results that you need. Figure 24.2 illustrates just one example of a Hybrid topology. It shows a Ring connected with a Star. It is important that you experiment with the different configurations to determine which topology best balances processing load, network traffic, and data latency.
The replication process makes several changes to the database. These changes are necessary in order to manage the demands of the replication process. The following is an overview of the changes made to a database when it is replicated:
During the replication process, the Jet engine determines whether each table contains a field with an AutoNumber data type and a ReplicationID field size. If it does not find a field meeting these criteria, it adds a field called s_Guid to the table. The s_Guid field uniquely identifies each record. It is identical across replicas.
The Jet engine also adds two additional fields to each table in the database: s_Lineage and s_Generation. The s_Lineage field stores the IDs of replicas that have updated a record and the last version created by those replicas. The s_Generation field stores information about groups of changes. These fields are only visible if you opt to view system objects (Tool|Options).
The Jet engine also adds several tables to your database. These tables track conflicts, errors, and exchanges that have been made between the replica databases. The most useful of these tables are MSysSidetable, MSysErrors, MSysSchemaProb, and MSysExchangeLog. These tables can be viewed if you have opted to view system objects.
The MSysSidetable table is used to track tables that have experienced a conflict during the synchronization process. It stores the name of the side table that contains the conflicting records.
The MSysErrors table tracks all unresolved synchronization errors. It is empty when all errors have been resolved. This table can be found in all of the replicas.
The MSysSchemaProb table identifies errors that occurred when synchronizing the design of a replica. It is visible only if a design conflict has occurred between the user's replica and another replica in the set.
The MSysExchangeLog table is a local table that stores information about synchronizations that have taken place between the local replica and other members of the replica set.
Several new properties are added to a replicable database. The Replicable property of the database is set to True. This property cannot be modified after it is set to True. The ReplicaID property is a unique ID that is assigned to each replica. The DesignMasterID property can be used to transfer the Design Master status to another database. This is generally done only if the original master becomes irreparably damaged.
In addition to the properties that apply to the database, two properties can be applied to the tables, queries, forms, reports, macros, and modules in the database. They are the KeepLocal and Replicable properties. The KeepLocal property is applied to an object before the database is replicated. It prevents the object from being copied to the other replicas in the set. The Replicable property is used after a database is replicated. It is used to indicate that the object is to be replicated.
Another important change is made to your tables when a database is rendered replicable. All of the Autonumber fields are changed from incremental to random. Existing records are not affected, but new keys are generated randomly. This is necessary because it reduces conflicts when the databases are synchronized. If all of the copies generate sequential keys, it is easy to see that conflicts will occur as you attempt to merge changes. With random generation of primary keys, this type of conflict is much less likely to occur.
When a database is replicated, its size increases. This is due to the fields and tables that are added to the database. Generally, this change in size is not a problem. If disk space is at a premium, you should consider this aspect of replication before you make a decision to build replication into your application.
A replicable database is simply a database whose Replicable property has been set to True. If a database has not been marked as replicable, you will not be able to replicate it.
When a database has been flagged as replicable, the Jet engine makes several changes to the database, rendering it replicable. Until these changes are made, the database is not recognized as part of a replication set and cannot be synchronized with other databases.
When you are ready to replicate a database, you should take the following steps:
You can make a database replicable via the Access user interface, the Windows 95 Briefcase, using the Replication Manager, or by writing code. This section covers making a database replicable using the Access user interface and using the Windows 95 Briefcase. Making a database replicable using the Replication Manager is covered in the section of this chapter entitled "The Replication Manager." Making a database replicable using code is covered in the section of this chapter entitled "Implementing Replication Using Code."
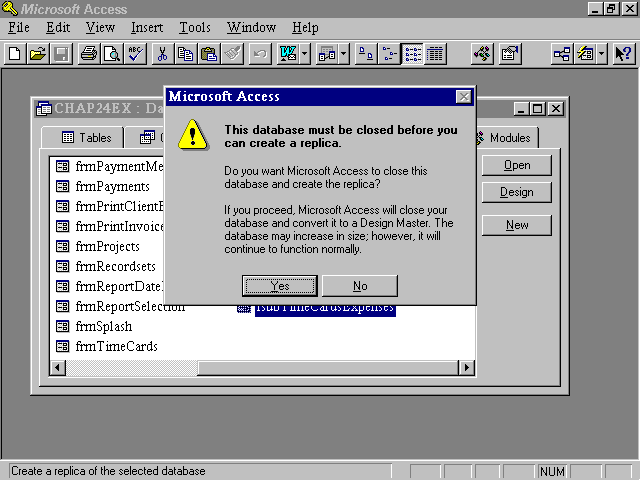
Select Tools|Replication|Create Replica. If the database you want to replicate is open, Microsoft Access gives you a warning that it must close the database before proceeding. This warning dialog is shown in Figure 24.3.
Figure 24.3. The Replication warning dialog asks you to confirm that it is okay for Access to close the database before converting it to a Design Master.
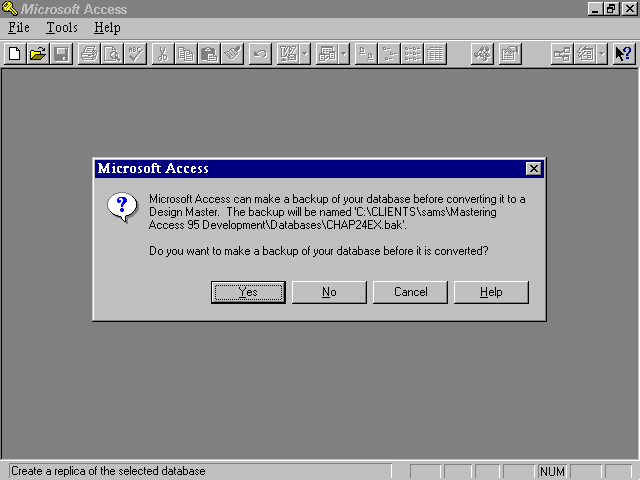
After selecting Yes (indicating that you want to proceed), you are presented with another dialog asking whether you want Access to make a backup of the original database before continuing (see Figure 24.4). It is always a good idea to backup a database before replicating it, especially because after a database is flagged as replicable, it cannot be returned to its nonreplicable state.
Figure 24.4. This dialog prompts you to have Access create a backup of the database before it is replicated.
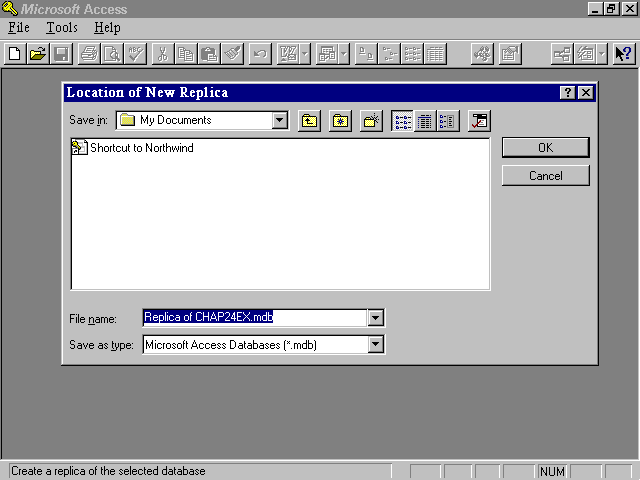
Next, you are prompted for the name and location of your new replica. The Location of New Replica dialog appears (see Figure 24.5). The Location of New Replica dialog enables you to specify a name and a location for the new replica. After you click OK, the new replica is created and the process completes.
Figure 24.5. The Location of New Replica dialog allows you to select a location for the replica.
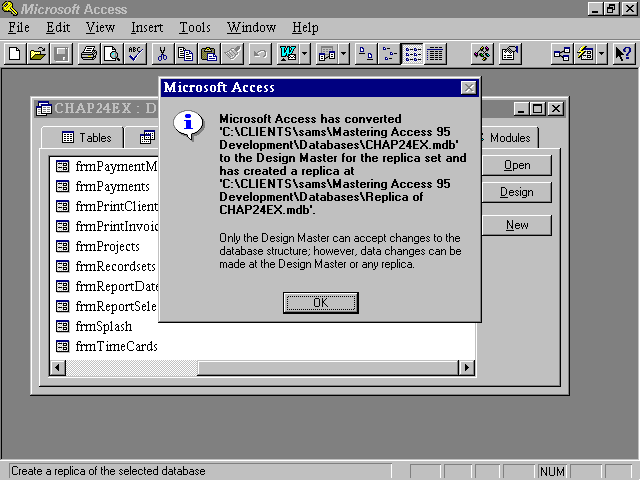
Your original database is converted to a Design Master. The replica is assigned the name and location specified in the Location of New Replica dialog. If the replication process completes successfully, the dialog shown in Figure 24.6 appears. Notice that only the design master can accept changes to the database structure (schema).
Figure 24.6. This dialog appears after successful replication of a database.
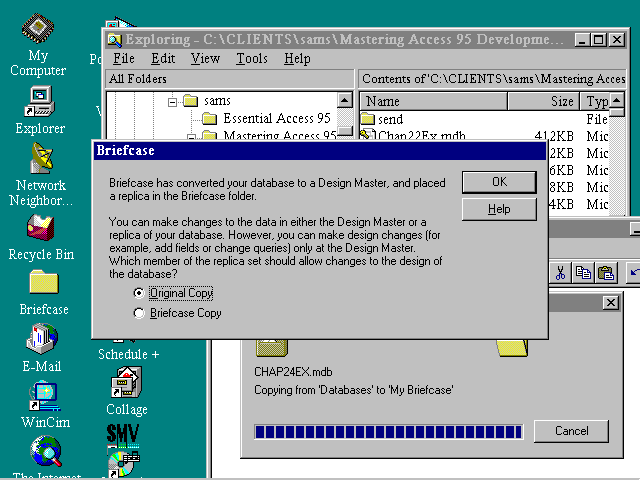
Instead of using the Access user interface to replicate a database, you can utilize the Windows 95 Briefcase to complete the process. All you need to do to initiate the process is to drag and drop the database file from the Windows Explorer to the Briefcase icon on your desktop. You are presented with the dialog shown in Figure 24.7.
Figure 24.7. This dialog appears after you drag and drop a database to the Briefcase to be replicated.
Except for the final message that you receive, you are presented with the same series of messages you receive when you select Replication from the Tools menu within the Access user interface. Only one database can be used to make design changes (for example, to modify table structures). The Briefcase dialog, shown in Figure 24.8, asks you which database you want to maintain as the Design Master. Generally, you select the Original Copy rather than the Briefcase Copy.
Figure 24.8. The final dialog that appears with Briefcase replication.
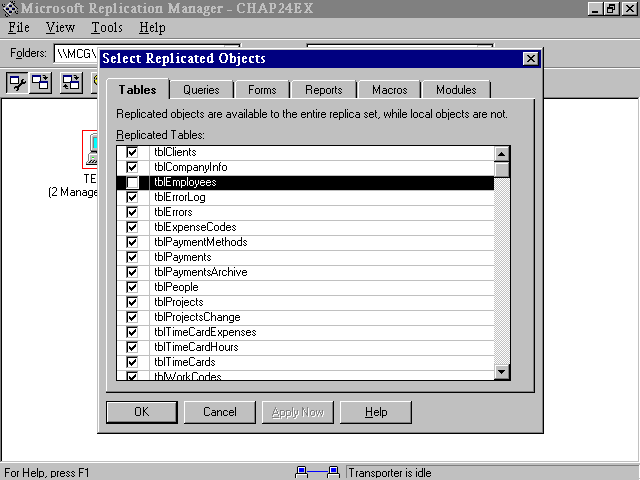
There are times when you might want to prevent specific objects in a replicable database from being replicated. This occurs when certain data in your database is confidential, or when it is unnecessary for most users to see certain data. An example would be an employee salary table that is maintained and used in the master but is not necessary for any of the replicas. The fewer objects that are replicated, the more effective the synchronization process will be. If you don't need an object to be replicated, set its KeepLocal property to True.
Designating that an object will not be replicated cannot be accomplished through the Access user interface. It can only be accomplished using VBA code or using the Replication Manager. It is accomplished by setting the KeepLocal property of the specific objects to True. When you attempt to set the KeepLocal property to True using VBA code, you get an error unless you have already appended the property onto the object. You must, therefore, include error handling in your code to handle this scenario. Using the Replication Manager to flag an object as nonreplicable is covered in the section of this chapter entitled "Replicating a Database Using the Replication Manager." The code required to add the KeepLocal property to an object and set its value to True is covered in the section of this chapter entitled, "Implementing Replication Using Code."
After you have made one replica, you probably want to make additional replicas. These additional replicas are copies that can be distributed throughout the organization. They can be created via the Access user interface, using the Windows 95 Briefcase, using the Replication Manager, or using VBA code.
An example of the use of multiple replicas would be a sales organization in which sales reps take copies of the database with them on their notebook computers. Each salesperson needs his or her own copy of the database. Each of these copies must be a replica. Otherwise, the work of each salesperson cannot be synchronized with that of the others.
As mentioned previously, replicas can be made using one of four methods. In addition, additional replicas can be made from any member of a replica set. Each replica set is independent from all other replica sets. Replicas from different sets cannot be synchronized with one another.
To create additional replicas using the Access user interface, follow these steps:
Additional replicas can also be made by dragging and dropping the Design Master, or any one of the replicas, to the Briefcase. If you drag and drop the Design Master to the briefcase, you are prompted with a dialog asking whether you want the Design Master or replica to be placed in the Briefcase.
To synchronize replicas means to reconcile all of the changes between them. Modified records are changed in all of the copies, deleted records are removed from all of the replicas, and added records are appended to all of the replicas.
The capability to synchronize is what makes data replication useful. The idea is that additions, modifications, and deletions are propagated among all of the replicas in a set. This enables all users to see the changes that the other users made.
As with creating a replica, Access provides you with four methods of synchronizing replicas. Synchronization can be accomplished using the Access user interface, the Windows 95 Briefcase, the Replication Manager, or through VBA code.
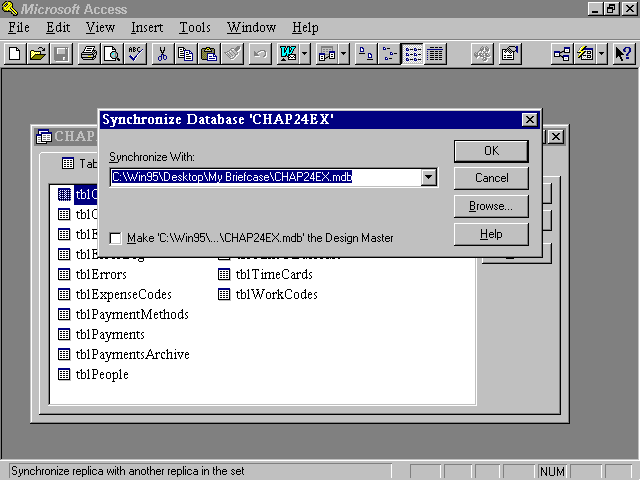
To initiate the synchronization process using the user interface:
Figure 24.9. The Synchronize Database dialog allows you to select the database with which you want to synchronize.
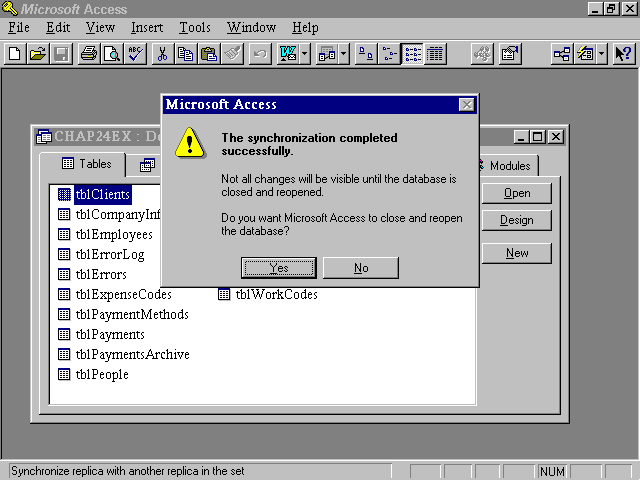
Figure 24.10. This dialog appears after a successful synchronization process.
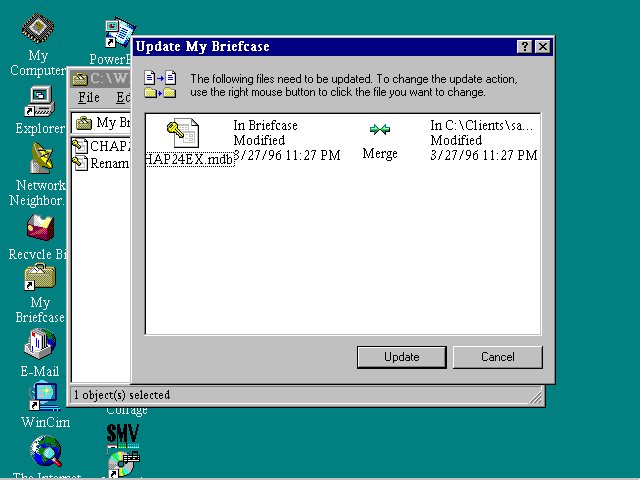
The second way to synchronize replicas is using the Windows 95 Briefcase. Simply open the Briefcase window and select the database file. On the Briefcase menu, click Update Selection. If you want to synchronize all of the replicas in the Briefcase, click Update All. The Update My Briefcase dialog appears (see Figure 24.11). Click Update. The synchronization process completes.
Figure 24.11. The Update My Briefcase dialog appears when synchronizing from the Briefcase.
When the Jet database engine attempts to synchronize two databases, it might find that the same row has been changed in both databases. A conflict results and must be handled. The rule is that the database in which the row has changed most often wins. If both rows have changed the same number of times, the winner is chosen randomly. This might sound frightening, but it isn't as bad is it seems because you are able to notify the user as to which changes were rejected.
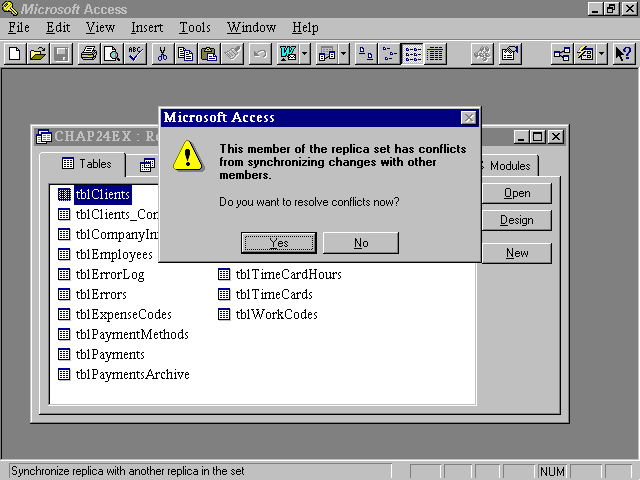
It is extremely important to know whether two members of the replica set contain conflicting information. Two users out in the field might have entered different information about a sale or a customer. It is important that the program identify these inconsistencies and provide a method for handling them.
If conflicts exist, you are warned about them when you attempt to open the database with the conflicts. The dialog shown in Figure 24.12 appears. At this point, you are given the choice of whether or not to resolve the conflicts.
Figure 24.12. This dialog warns of synchronization conflicts.
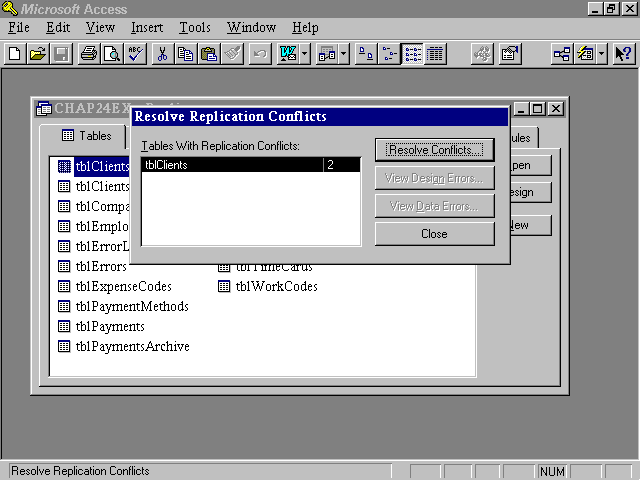
If the user selects Yes, the Jet engine attempts to identify the conflicts. After identifying the conflicts, the Resolve Replication Conflicts dialog, shown in Figure 24.13, appears. Notice that in this example, the Jet engine identified two conflicts in the tblClients table. The user can opt to resolve the conflicts or to postpone the conflict resolution.
Figure 24.13. The Resolve Replication Conflicts dialog enables you to resolve conflicts between tables.
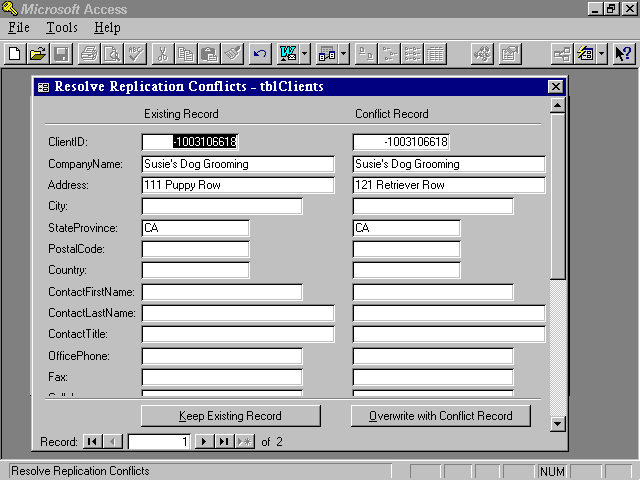
If the user clicks Resolve Conflict, an additional Resolve Replication Conflicts dialog appears (see Figure 24.14). This dialog presents the user with each record containing a conflict, providing the user with the opportunity to keep the existing record or to overwrite with the conflict record.
Figure 24.14. An additional Resolve Replication Conflicts dialog enables you to view and resolve specific conflicts.
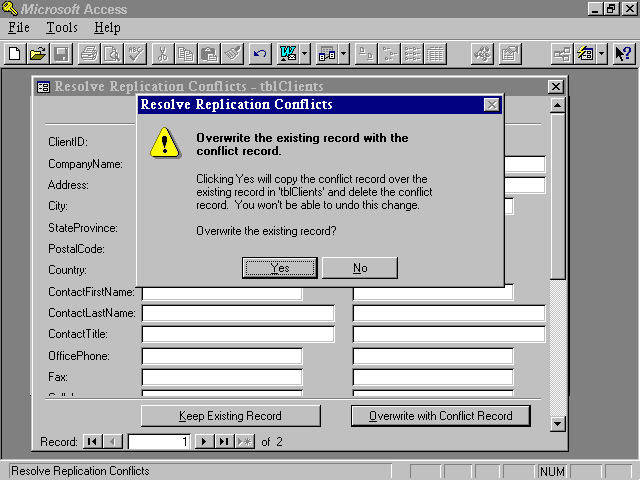
After you select Overwrite with Conflict Record, an additional Resolve Replication Conflicts dialog appears (see Figure 24.15). This dialog serves to warn the user that data in the conflict record will overwrite data in the existing record. The user is given the opportunity of proceeding with or canceling the process. If the user selects Keep Existing Record, the warning dialog shown in Figure 24.16 appears. This dialog warns the user that the existing record will be maintained and the conflict record will be permanently deleted.
Figure 24.15. This warning message appears when the user selects Overwrite with Conflict Record.
Figure 24.16. This warning message appears when the user selects Keep Existing Record.
After the user resolves all conflicts, a message appears, indicating that he or she successfully resolved all conflicts.
The Replication Manager, as discussed earlier in the chapter, is an extremely powerful tool that enables you to take full advantage of replication in Access 95. The major benefits provided by the Replication Manager include the following:
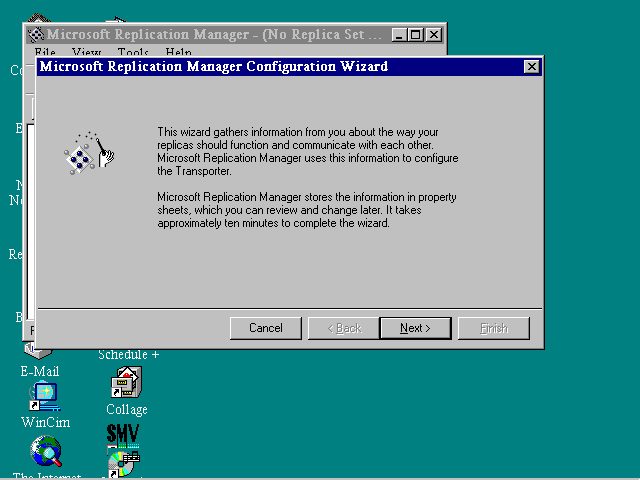
The Replication Manager can be accessed using a Desktop shortcut or through the Windows 95 Start menu. The first time you run the Replication Manager, the Configure Microsoft Replication Manager dialog appears (see Figure 24.17).
Figure 24.17. The Configure Microsoft Replication Manager dialog.
Figure 24.18. The Replication Manager Configuration Wizard.
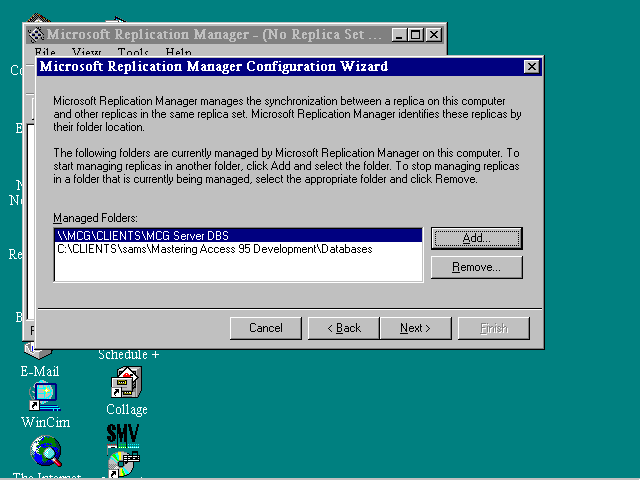
Figure 24.19. Replication manager configuration. Selecting Managed Folders.
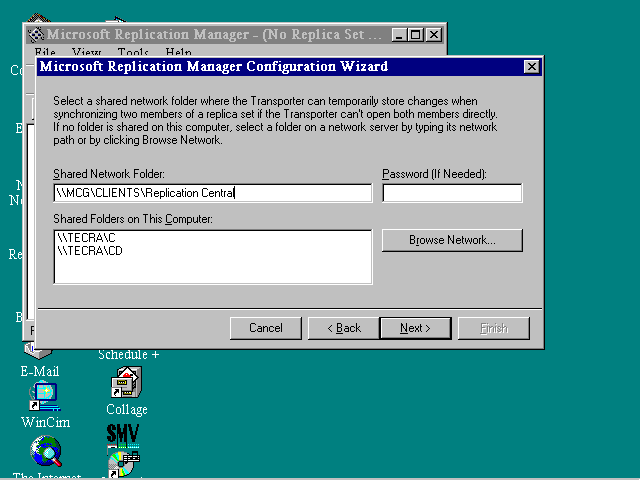
Figure 24.20. Selecting the location for the Transporter to store changes.
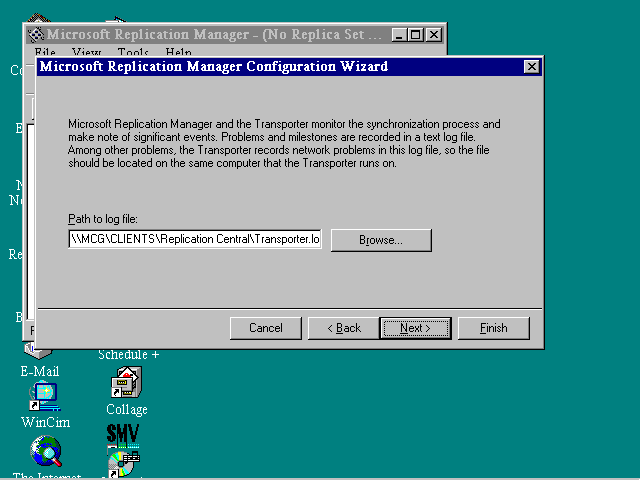
Figure 24.21. Selecting the name and location for the log file.
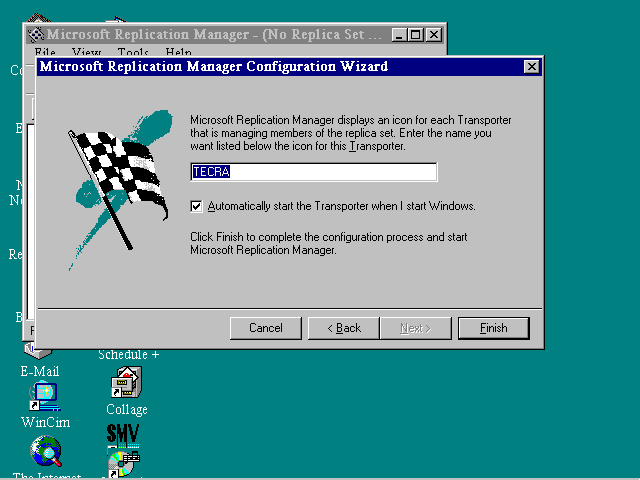
Figure 24.22. Selecting an icon for the transporter managing members in the replica set.
After the Replication Manager Configuration Wizard is complete, you are given the opportunity to either convert a database to a Design Master, or to create a new replica (see Figure 24.23). You can perform these tasks at any time, so generally you should click Cancel.
Figure 24.23. The Replication Manager launches for the first time.
In addition to using the Access user interface and the Briefcase to make a database replicable, you can also use the Replication Manager to accomplish this task. As you will see, making a database replicable using the Replication Manager offers additional options such as designating an object as local. Here's the steps:
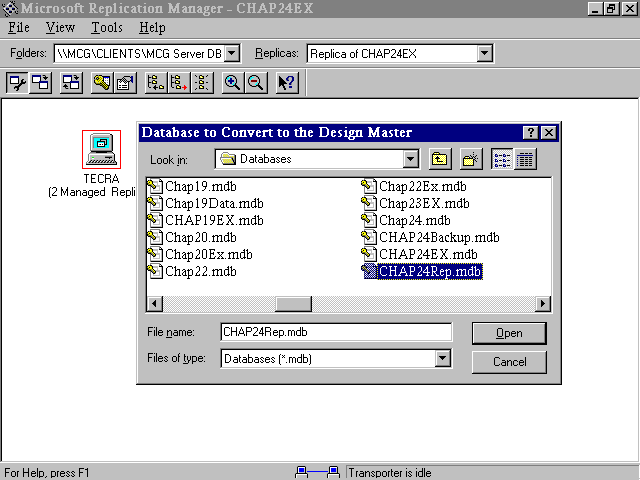
Figure 24.24. Selecting a database to convert to a Design Master.
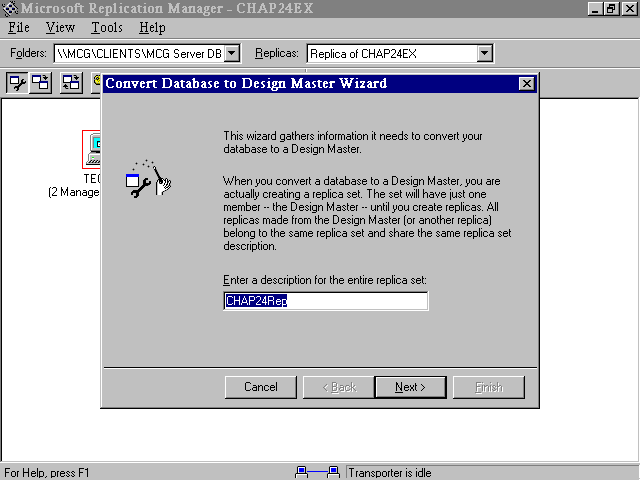
Figure 24.25. Entering a description for a replica set.
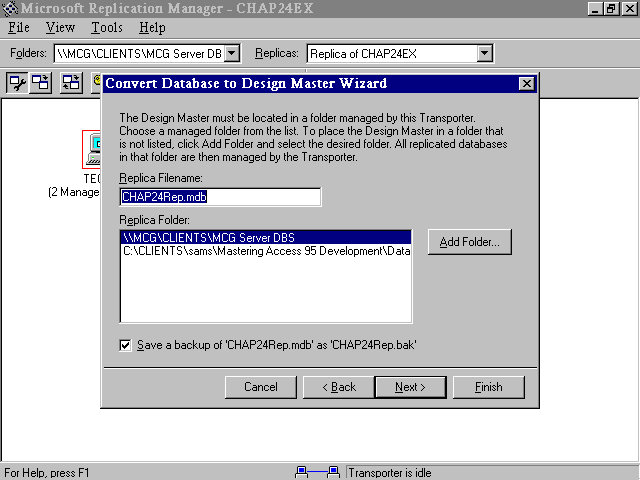
Figure 24.26. Selecting a Managed Folder for the database.
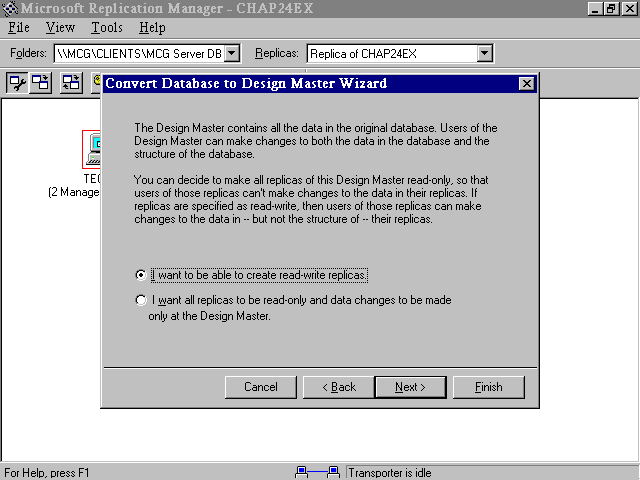
Figure 24.27. Indicating whether the database will allow read-write replicas to be created.
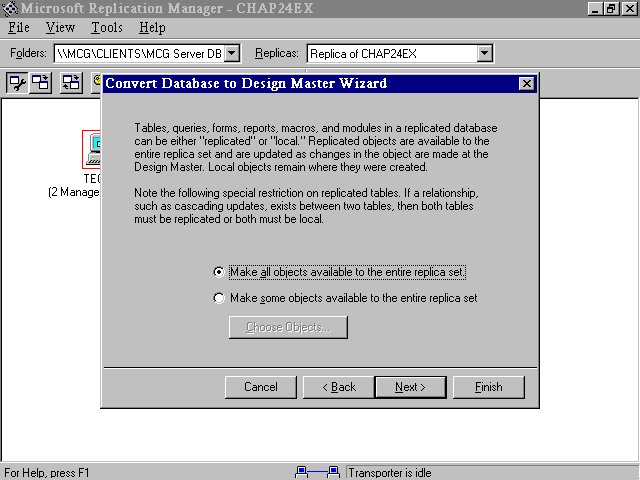
Figure 24.28. Designating whether you want all objects to be replicated.
Figure 24.29. Deselecting objects to keep them local.
Just as you can create replicas using the Access user interface and the Windows 95 Briefcase, you can also create replicas using the Replication Manager.
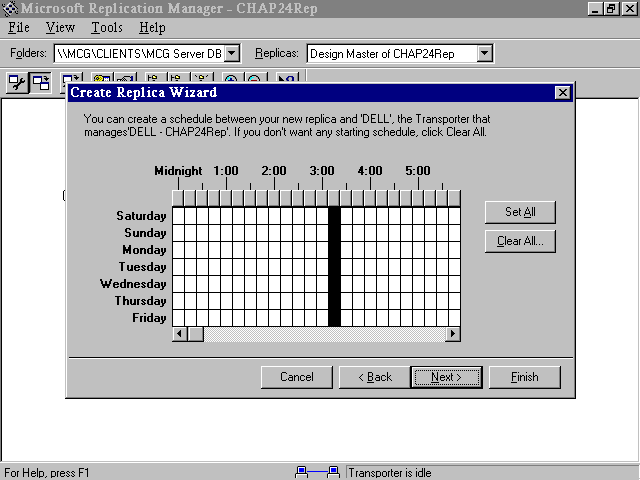
Figure 24.30. The dialog prompting you to schedule synchronization of replicas managed by different Transporters.
Just as you can synchronize replicas using the Access user interface and the Windows 95 Briefcase, you can also synchronize replicas using the Replication Manager.
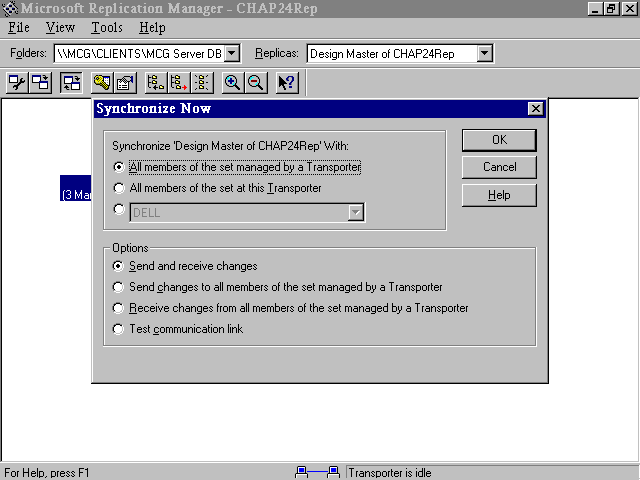
Figure 24.31. The Synchronize Now dialog allows you to designate the details of the synchronization process.
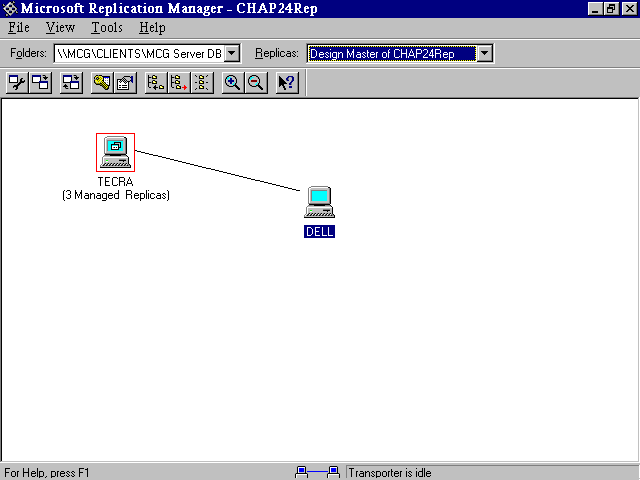
You might be surprised that the Replication Manager map shows only one machine, even though you have many replicas. One icon appears for each transporter involved in the replica set. Figure 24.32 shows a scenario where two transporters are involved in the replication process: Tecra and Dell. The second site was set up by installing the Replication manager on the second machine. Any replica from the local site can then be moved to the remote site by establishing a connection to the remote site and selecting File|Move Replica. You can then locate the Managed Folder at the remote site and move the replica to the remote site's Managed Folder.
Figure 24.32. Replication manager map with two transporters.
After both sites appear on the replication map, you can manage synchronizations using the join line that connects them. You can right- click on the join line and select Synchronize Now or, to establish a schedule for synchronization, select Edit Schedule. Scheduling synchronization is covered in the next section.
Synchronizations can be scheduled between replicas managed by the same transporter, or between replicas managed by two different transporters. To schedule synchronization between replicas managed by the same transporter, right mouse click on the icon representing the local transporter and select Edit Locally Managed Replica Schedule (see Figure 24.33). From here you can select the days and times when the replicas synchronizes.
Figure 24.33. The Edit Locally Managed Replica Schedule dialog allows you to select the days and times when the replicas synchronizes.
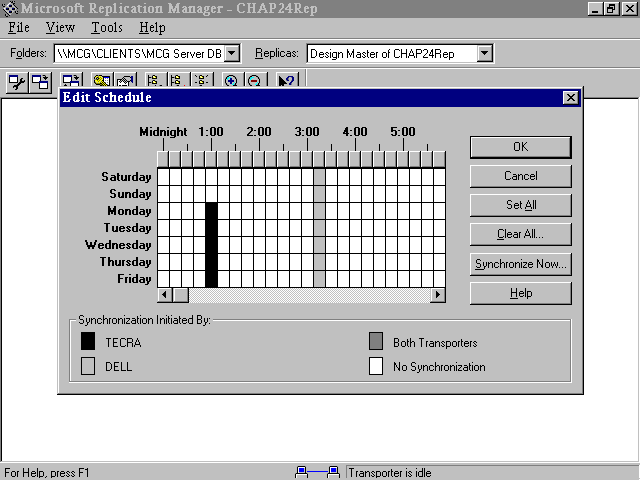
To schedule the synchronization process between two different transporters, right- click on the line joining the two transporters and select Edit Schedule. The Edit Schedule dialog appears (see Figure 24.34). Here you can schedule the specifics of the synchronization process between the two sites. The shading of each box is used to indicate which transporter initiates that exchange. If the connection cannot be made when the exchange is initiated, the drop-box folder is used to maintain a temporary log of the changes. Every 15 minutes it reattempts the connection until it is successful.
Figure 24.34. The Edit Schedule dialog for remote replicas enables you to schedule the specifics of the synchronization process between two sites.
It is very useful to be able to view the synchronization history. Besides providing an audit trail, this helps you to analyze the effectiveness of the topology and synchronization schedule that you have selected. Three types of logs are maintained by the Replication Manager:
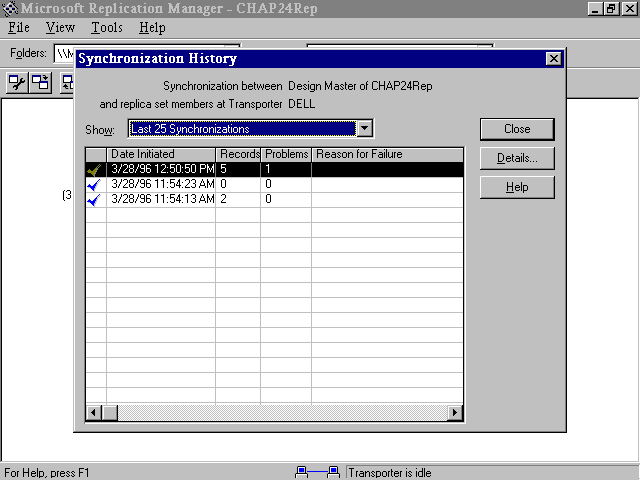
To view the local synchronization history, right-click the local machine icon and select View Local Synchronization History. The Synchronization History dialog appears (see Figure 24.35). This dialog shows you details about the exchange of information between the local replicas.
Figure 24.35. View Local Synchronization History.
To view the remote synchronization history, select the line joining two transporters and select View|Synchronization history. The Synchronization History dialog appears (see Figure 24.36). If you wish to see additional details about any of the entries in the log, click Details. The Synchronization Details dialog appears (see Figure 24.37).
Figure 24.36. View Synchronization History of a remote transporter.
Figure 24.37. The Synchronization Details dialog shows the details of a synchronization process.
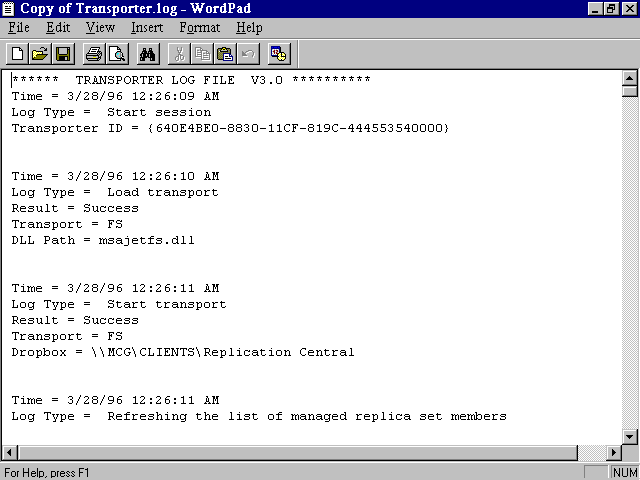
Finally, you can view a Synchronization Log. Select View|Transporter log. Word Pad launches and loads the log file that you designated when you configured the Transporter. This log contains a textual description of everything that has happened involving the local transporter (see Figure 24.38).
Figure 24.38. The Synchronization Log provides a textual description of what has happened with a local transporter.
You can view properties of the selected transporter. To do this, double-click the Transporter. If you double-click a local transporter, the Replica Properties window appears (see Figure 24.39). If you double-click a remote transporter, the Transporter properties window appears (see Figure 24.40). Each tabbed dialog provides important information about the selected transporter.
Figure 24.39. The Transporter Properties dialog of the Replication Manager window provides information about the selected transporter (in this case, the local transporter).
Figure 24.40. The Transporter Properties dialog showing information about a remote transporter.
Most of the replication functions can be implemented using code. This is not the easiest way to manage replication. You might at times want to implement aspects of the replication process using code so that you can better control the process, and its interface, from within your application.
The following routine renders a database replicable using code.
Sub MakeReplicable(strTargetDB)

    Dim db As Database

    Set db = DBEngine(0).OpenDatabase(strTargetDB, True)

    db.Properties.Append db.CreateProperty("Replicable", _

         dbText, "T")

    db.Close

End Sub
This routine accepts any database as a parameter. It opens up the database exclusively. It then appends the Replicable property to the database. This property contains a text value (dbText). You set its value to True.
Unless you do something special, all objects in a database are included in the replication process. The following code illustrates how to flag a database object as Local. It sets the KeepLocal property of the tblEmployee table to True.
Sub MakeLocal()

    Const errPropNotFound = 3270

    Dim db As Database

    Dim tdf As TableDef

    On Error GoTo MakeLocal_Err

    Set db = CurrentDb

    Set tdf = db.TableDefs!tblEmployee

    tdf.Properties("KeepLocal").Value = "T"

    Exit Sub

MakeLocal_Err:

    If (Err = errPropNotFound) Then

        tdf.Properties.Append tdf.CreateProperty("KeepLocal", dbText, "T")

    Else

        MsgBox Error

    End If

End Sub
Notice that the code is set up to handle the error that occurs if the object, in this case the tblEmployee table, does not already have a KeepLocal property. The error handler appends the property to the object at runtime. The code then sets the KeepLocal property of the object to True.
A new replica can be created with code by using the MakeReplica method. The code looks like this:
Sub MakeReplica(strRepCopy)

    Dim db As Database

    Set db = CurrentDb

    db.MakeReplica strRepCopy, ""

    db.Close

End Sub
This code accepts a parameter that contains the path and filename for the replica. The MakeReplica method is executed on the database object. The parameter name becomes the name of the replica. The last parameter indicates whether or not the replica is created as read-only.
There are times when you will want to complete the synchronization process using VBA code. The following routine synchronizes the current database with the database whose name is passed as a parameter. The constant dbRepImpExpChanges indicates that you want to perform a two-way synchronization.
Sub Synchronize(strDBToSync)

    Dim db As Database

    Set db = CurrentDb

    db.Synchronize strDBToSync, dbRepImpExpChanges

    db.Close

End Sub
You can also handle conflicts using code. What you do when a conflict is identified, is up to the business needs of your users.
Sub IdentifyConflicts()

    Dim db As Database

    Dim tdf As TableDef

    Dim rstErr As Recordset

    Set db = CurrentDb

    For Each tdf In db.TableDefs

        If Len(tdf.ConflictTable) Then

            Set rstErr = db.OpenRecordset(tdf.ConflictTable)

            Do While Not rstErr.EOF

                Debug.Print rstErr.Fields(0).Value

                rstErr.MoveNext

            Loop

            rstErr.Close

        End If

    Next td

End Sub
This routine goes through each table, determining whether something is in the ConflictTable property of that table. If the ConflictTable property has something in it, a recordset is opened from the Conflict table. The routine loops through each record of the Conflict table, displaying the value of the first field in the Debug window.
You must make a decision as to whether it is necessary to implement replication within the Time and Billing Application. A great application of replication within the Time and Billing program is a scenario where you have many consultants who work out in the field and need to enter client, project, billing, and expense information while on the road. Using what you have learned in this chapter, you can ensure that all changes made to each consultant's copy of the database are sent to the main server database each time the consultant dials into the office.
Replication can also be used so that the data managed by the Time and Billing application is backed up during the day. This minimizes the chance of data loss or down-time. Finally, you might want to implement replication within the Time and Billing application to distribute the work load over a few servers in your organization.
The potential benefits of using replication with the Time and Billing application are many. With what you have learned in this chapter, you must decide whether replication is appropriate for your application and how it will best be implemented within your organization.
Replication is a very complex and robust feature of Access. It can be used at the most basic level to synchronize changes been two databases, or, in an enterprise-wide application, to synchronize changes between many machines on a WAN (Wide Area Network). The easiest, but least robust, way to implement replication is using the Access user interface or the Windows 95 Briefcase. With the Replication Manager, you can schedule and manage synchronization activity, as well as handle the most complex of replication topologies. Finally, using code you can customize the behavior of your application's synchronization activities. All of these methods of implementing replication were covered in this chapter.
![]()
![]()
![]()
![]()
![]()